Having your own body of water to plunge into on a hot day is the dream of almost every summer resident. To some it seems impracticable, but others get down to business and prove that nothing is impossible. To help the latter, we will tell you how to make a pool with your own hands and provide step-by-step instructions for this process.
Types of pools
There are four types of pools suitable for use in the country:
- inflatable. Almost everyone is familiar with them, since they have probably seen children splashing in such rubberized baths more than once. However, now manufacturers also produce large pools with a displacement of several tons.
Among the advantages of this type, it is worth noting that it is cheap and easy to transport (when folded, they fit into the trunk of a car), and the disadvantages are fragility and susceptibility to mechanical damage;
- frame. Prefabricated structures, easy to install, and therefore quite transportable. They last longer than inflatable models, but their price is also higher.

Assembly and dismantling of such a pool does not cause difficulties, and they are less susceptible to mechanical damage. But like any mobile structure, frame pools are not durable;
- propylene. They are a bowl made of polypropylene and filled with water. They are characterized by good waterproofing, long service life and ease of installation.

Disadvantages include the high cost and difficulty of delivery, since most often the bowl is purchased ready-made;
- foundation pits Pools poured from concrete in a pre-dug pit. Their construction is a rather labor-intensive process, but this pool on the site is difficult to damage, and with proper care it will last for decades.

If you undertake to build it yourself, you will succeed inexpensive pool, but at the same time durable and easy to use. It is difficult to make such a country pool with your own hands, but it is possible. We will tell you how later.
Choosing a pool location
When choosing a site to place a pool, follow these recommendations:
- Locate the pool away from trees. Their roots can damage the waterproofing and create water leakage, and the foliage will add to the work of cleaning the bowl from debris;
- the groundwater level under the pool must exceed 1 meter, otherwise they may come to the surface, and together with the artificial one you will have a natural reservoir resembling a swamp;
- give preference to an area with clay soil. Clay does not allow moisture to pass through well and will provide additional waterproofing;
- take into account the wind rose. The wind carries debris, so build your pool so that you have access to an area where this debris will accumulate.
How to make a pool with your own hands?
And now the promised step-by-step instructions, how to build a country pool with your own hands.
1. Develop a preliminary project in which you should take into account the location of the pool (we wrote about it above), the shape and size of the bowl and the supply of communications (water intake and drainage).
2. Mark boundaries. Using a tape measure, pegs and rope (twine), mark the area.
3. Dig a pit. Its length, width and depth should be about half a meter larger than the design ones, the walls should have an outward slope of 5-6°, and the bottom should be inclined to one side by 5°.

4. Level and compact the bottom, then fill it with a 30-centimeter layer of sand or crushed stone and lay two rows of roofing felt on top with bitumen mastic, thus providing waterproofing for your pool.

5. Make formwork from wooden beams and boards. To strengthen and strengthen the structure, use reinforcement: rods with a diameter of 4-8 mm are suitable.
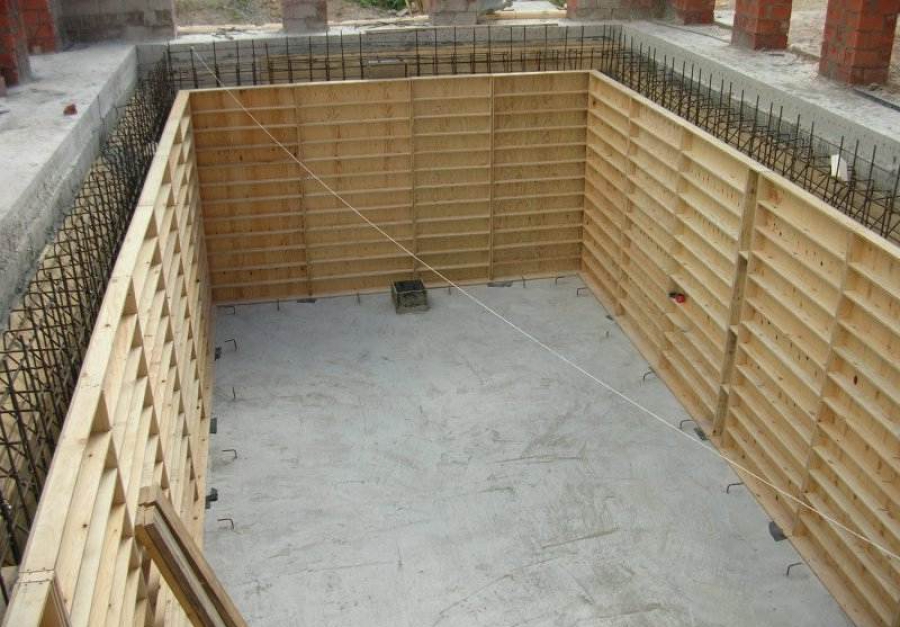
6. Fill the hydraulic concrete, having previously installed the water supply pipe and drain. If there is no hydraulic concrete, use cement (grade C500) mixed with sand in a 2:1 ratio. When you remove the formwork, treat the walls with cement laitance, applying it with a brush.

7. Line the pool. PVC film for swimming pools, tiles, and mosaics are suitable.

All that remains is to landscape the remaining area, which our article “10 budget ideas to make your garden picturesque” will help you with, and enjoy your vacation.
We hope that with our instructions, making a pool with your own hands at the dacha will not be difficult. If you still doubt your capabilities, then take on a simpler frame version of a country pond:
Not every summer resident is lucky enough to have his own house near a pond, where after physical work he can relax and enjoy cool water. The rest have to either get into the car and go in search of the nearest river, or make a pool with their own hands at the dacha. More often they choose the second option, because in addition to relaxation, the pool also provides side benefits:
- warm, settled water, which can be used to water flower beds and vegetable gardens (if you did not add chemical disinfectants to the pool!);
- the opportunity to switch children who are keen on tablets, mobile phones and laptops to a healthier vacation;
- improvement of the body, etc.
All that remains is to choose from the many options for stationary pools the one that suits the needs of the family and the landscape of the site.
To simplify the maintenance of your built pool, consider the following points already at the planning stage:
- It is better if the pool area has clay soil. It will stop water leakage in case of waterproofing failures.
- Choose a place with a natural slope of the soil. This will make it easier for you to dig a pit and immediately decide where to install the drainage system.
- Tall trees should not grow near the future pool, because their root system, sensing the proximity of moisture, will reach the walls of the structure and can ruin the waterproofing. Poplar, chestnut, and willow are considered the most “aggressive”. If there are already trees growing on the site, you will have to part with them in advance. It's cheaper than rebuilding a damaged pool.
- Low-growing trees are also undesirable, because you will have to constantly remove leaves from the bowl, and during the flowering period the water turns yellow with pollen.
- Pay attention to which direction the wind most often blows at your dacha, and try to place the pool so that the air moves along the bowl. Then all the dirt and debris will be nailed to one wall, along the edges of which it is recommended to install a drain system.
- Try to locate the pool closer to the water supply to make it easier to fill.
Preliminary calculations - sizing
The width and length are determined based on the purpose of the pool. If it is intended for swimming, then choose a rectangular shape, making the bowl elongated. If for relaxation, splashing and resting the whole family, then it is more convenient to communicate in round bowls.
A more important criterion is depth. It is believed that in order to feel free, swim easily, turn around under water and jump from the side, you need a depth of one and a half meters (and no more!). But ski jumping requires a deeper bowl - at least 2.3 m. However, it is enough to make such a depth in the diving area, creating a smooth transition from the main size (1.5 m).
If the construction of a swimming pool at the dacha is intended exclusively for children's recreation, then the depth of the bowl should not exceed half a meter. This is enough for fun games and wallowing without risk to health.
The most complex design is a combined pool in which everyone will swim. In this case, different depths are created for the children's and adult zones, and both zones must be separated by a strong partition that starts from the very bottom. This will ensure that children do not accidentally enter the adult area.
Important! In any pool that has several different depths, it is necessary to make the bottom flat and smoothly transition from one size to another. Sudden changes in depth are unacceptable for safety reasons. A person, walking along the bottom, can gape and miss the boundary beyond which another depth begins, and in a panic, when his legs instantly go down, the risk of choking is very high.
Choosing a bowl: buy ready-made or make it yourself?
The most labor-intensive work involves preparing the pit and filling the bowl. But manufacturers have figured out how to build a swimming pool in a country house faster and easier. They created ready-made bowls that only need to be dug into the ground and fixed. In addition to the obvious advantage of ease of installation, ready-made structures are also advantageous in that they come in all sorts of shapes and colors, which cannot be said about concrete. In addition, during operation, concrete bowls may crack if the soil begins to move.
Types of finished bowls: plastic and composite
There are two types of ready-made bowls on sale: plastic and composite. The principle of their installation is absolutely the same. Only the technical characteristics of the materials differ.
A plastic bowl requires additional insulation of the pool walls from the outside
In plastic structures, the main material is polypropylene. It is not afraid of fading, does not require draining water for the winter, is environmentally friendly, and is resistant to mechanical stress. And the smooth surface prevents the formation of plaque and sediment on the walls and bottom. Such bowls do not require additional interior finishing because they look aesthetically pleasing. The only negative: if the pool is installed in a place where there is no shade, then in the heat the polypropylene can expand, causing the bottom and walls to “ripple.” But as soon as the temperature drops, the bowl takes on its normal appearance.

Composite bowls are made of fiberglass, which is not afraid of either frost or heat.
Composite structures do not have this problem. The main material in them is fiberglass, which is bonded with polymer resins. All the advantages characteristic of plastic bowls are also characteristic of this material. But there is a small “but”: the composite is quite expensive.
DIY bowl options
And yet, some summer residents still prefer bowls that are created on site, because you cannot always find a container with the size and shape that ideally suits a specific landscape, and very large pools (about 10 m in length) cause difficulties in transportation. The vast majority of owners make swimming pools for their summer cottages with their own hands from concrete. This material is always on sale. If it is impossible to deliver it to the site in the form of a liquid solution, an ordinary concrete mixer is installed and a mixture is created on site with the addition of sand.

A bowl made of polystyrene foam blocks is easy to install due to the lightness of the material and perfectly maintains the water temperature
It is possible to create the entire bowl from concrete, including the walls, but this requires a long time and a lot of labor to install the formwork and pour it.
Resourceful summer residents came up with a simpler design for a swimming pool at their dacha: they kept only the bottom concrete, and began making the walls from polystyrene foam blocks or steel sheets. In the first option, the pool turns out to be warm, since polystyrene foam has low thermal conductivity. Steel walls are very easy to install, as they are sold ready-made with all additional equipment in the form of facing film and mounting hardware.
Installation of a swimming pool with a finished bowl
Let's look at how to make a swimming pool at your dacha using a factory-made bowl.
Site marking
- We carefully measure the bowl delivered to the site.
- We mark the location of the future pit on the ground using pegs and rope. We drive pegs into the corners of the future bowl, and stretch the rope between them. The more irregular the shape of the pool, the more often you drive in the pegs.
- We step back a meter from the stretched rope and make marks along the entire perimeter (cut off the soil, hammer in new pegs, etc.). It is from this marking that you will begin to dig the pit. This reserve is needed to make it easier to lower the bowl, insulate its walls and create a solid foundation.
- We remove the internal markings and start digging a pit.
Excavation

The pool pit must have a flat and stable bottom, so it is concreted
The pit should be half a meter deeper than the size of the bowl itself. Now we create a base on which we will place the bowl:
- Spread the bottom with a 20-centimeter layer of coarse sand and compact it.
- We lay a metal mesh over the sand for a fortress and pour concrete mortar, 25 centimeters thick, over it. We wait until it dries.

The concrete layer used to fill the bottom must be reinforced so that it does not crack when the soil moves
After this we insulate the pool:
- We lay geotextiles over the entire concrete base, and three-centimeter slabs of expanded polystyrene on it. They will insulate the bottom of the pool from the cold ground.
- Lay a thick, durable film over the insulation.
- While the bowl is at the top, its walls should be insulated. The outer surface of the walls is “packed” in polystyrene foam and insulated with polyethylene.

The outer walls of the bowl are insulated with polystyrene foam to insulate them from cold ground
Installing the bowl and connecting communications
- We lower the prepared bowl to the bottom of the pit.
- We connect all the necessary communications to the bowl. We put a protective sleeve on the pipes and secure it with tape so that it does not move during concreting.

Spacers will prevent the bowl from bending when the concrete reinforcement of the pool is poured; And all pipes must be packed in a protective sleeve so that they do not freeze in winter
- We concrete the remaining voids between the soil and the walls of the pool as follows:
- We install spacers inside the bowl so that the plastic or composite does not bend under the pressure of the concrete mass;
- We put up the formwork and lay reinforcement around the perimeter;
- We do not pour the solution all at once, but in layers: we fill the pool with 30-40 cm of water and raise the concrete to the same height. We wait for it to harden, then water again - and after that the concrete. This way we bring the concrete layer to the soil surface.
- We wait a day until the pouring hardens and only then remove the formwork.
- We fill the voids from the formwork with sand, pouring it with water and compacting it.
All that remains is to decorate the pool area and fill it with water.
For outdoor pools, it is advisable to create a canopy roof that will protect you from dirty precipitation, or at least sew an awning with which you will cover the structure when you leave the dacha.
If installing swimming pools at your dacha seems like a difficult task, buy an inflatable or frame version. Such pools are quite suitable for water recreation, and for the winter you can easily disassemble them and hide them in the attic.
On a hot summer day, it’s difficult to deny yourself the pleasure of cooling off in a cool pond. Not everyone has a country house on the banks of a river or lake, and building a permanent pool requires space, time, and material costs.
Is there an alternative to capital expensive construction? Fortunately, people's ingenuity did not ignore this issue. We have selected not just the most interesting and simple ideas, but also the most viable ones that can be realistically implemented on a summer cottage without special skills.
The presented structures are not designed for 10-year use; they do not comply with all swimming pool construction standards. But the authors set completely different goals: cheap, fast, seasonal. Nevertheless, certain rules must be followed during such construction, so first we will familiarize ourselves with the general recommendations.
Important points when planning and building a homemade pool
Regardless of the choice of material for the construction of a seasonal pool, we recommend paying attention to the following points:
- the place for the pool should be in direct sunlight, and not in the partial shade of the garden: the water will heat up faster and there will be less debris in the form of falling leaves and insects;
- the area must be leveled and compacted;
- the bottom and walls of a homemade bowl should not have sharp protrusions or a hard surface;
- you need to immediately think about how and where the water will be drained during regular replacement (especially if installing filters is not provided);
- the frame needs to be strengthened so that the structure does not fall apart under water pressure;
- when purchasing a waterproofing film (tarpaulin), take into account the size of the container with a margin of 50 cm around the entire perimeter.
When installing a budget pool, do not forget about landscaping the area around it. You can make an embankment of pebbles or river sand around the perimeter, decorate the approaches with decking boards, or simply knock down wooden flooring from old pallets. Also, for comfort, it is advisable to consider a towel rack.
Just dig a hole and cover it with film
The first stage is the most labor-intensive - digging a hole of suitable size and depth. When the pit is ready: the bottom is leveled and compacted, the walls are perpendicular to the bottom and do not crumble, proceed to the second stage - preparing the surfaces.
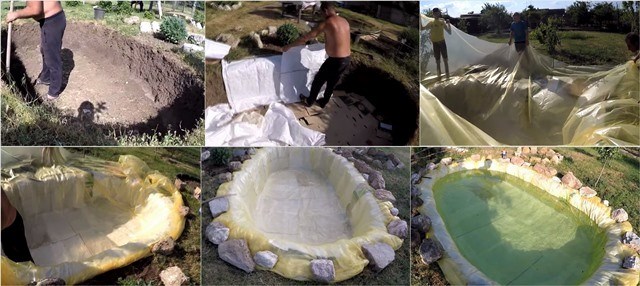
Cut cardboard boxes are laid on the bottom to make it soft to step on. The walls are covered with bags so that the film does not tear on uneven surfaces and plant roots.
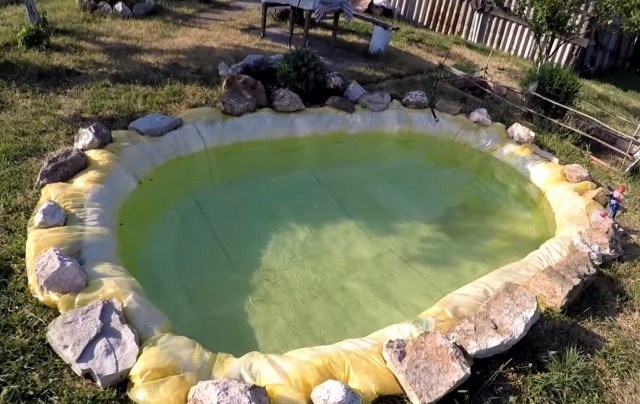
At the third stage, the pit is covered with waterproofing film. The upper edge is pressed with stones, which additionally plays the role of decoration.

You can bury a bowl made of scrap materials, covered inside with film, into the soil. This will require a lot of effort, but it will be possible to increase the depth of the pool. Since the edges of the bowl protrude above the soil surface, the soil will not be washed into the water.
We are sure that you will like the idea of having a swimming pool. And by next season you won’t want to build temporary structures. The optimal solution would be to organize a pleasant vacation spot for many years to come. To build a private pool, it is best to contact professionals who will help at all stages of its construction. The POSEIDONSTROY company has already received many good reviews. They will be able to make a pool according to your wishes or offer standard projects for implementation.
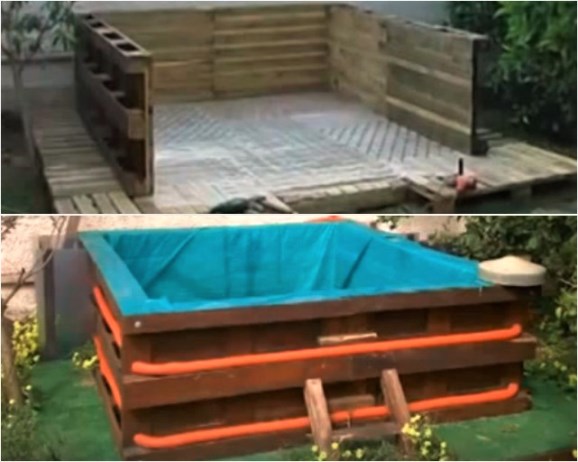
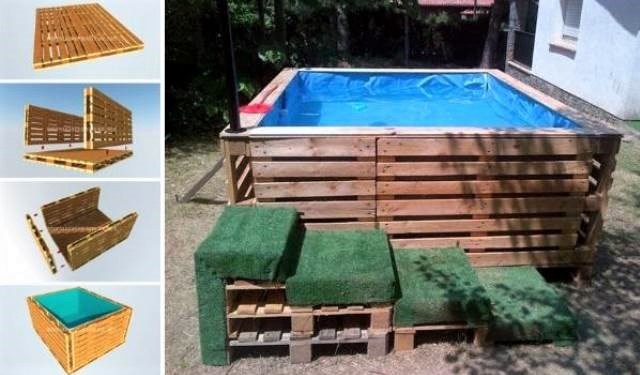
Frame pool made from pallets
To begin, choose a flat area and cover it with a thick tarpaulin (perhaps an old banner or canopy). Next, take 9 pallets and fasten them with screws and slats. Pallets are placed on edge, connected by a ring. When the round frame is ready, it is secured with tie straps for additional rigidity.
At the next stage, the inner surface of the “bowl” is covered with thick greenhouse film, and old towels, bedspreads or blankets are placed on top at the junction of the pallets and on the bottom. This is done to soften the surface so that while swimming it is comfortable to press against the stacks and walk along the bottom.
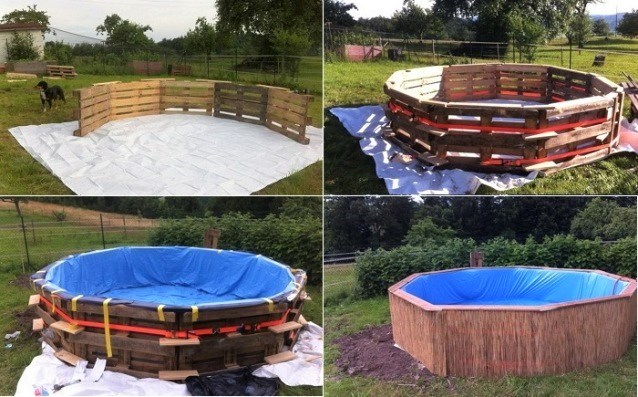
The final layer is a waterproofing film. If it is blue or blue, the water in the pool will always be bright. Some advise using black film to improve water heating. It is important that under the film there are no open sharp corners, protruding boards or rough surfaces on which the film will quickly tear.
The film is secured to the top edge of the pallets using a special adhesive tape. For decorative finishing of the outside of the pool, you can use reeds or bamboo. Narrow boards are nailed on top to hide the pallets.
The frame can also be made rectangular by connecting the pallets at right angles. The bottom can also be lined with pallets.
To create the most comfortable zone, you can attach a lighting stand to the corner and make steps from pallets.
These pools are filled with tap water from a garden hose and drained manually or using a low-power pump. If chemicals were not used for disinfection, then vegetable beds and flower beds can be safely watered with water.
Pool made from old boxes
The pool frame can be made from old wooden or plastic boxes. They make up a rectangular box, fasten each one together and additionally wrap it around the perimeter with plastic tape.

The structure is assembled on a tarpaulin. The inside of the box is covered with a thick waterproofing film, pressing the top edge with wooden boards.
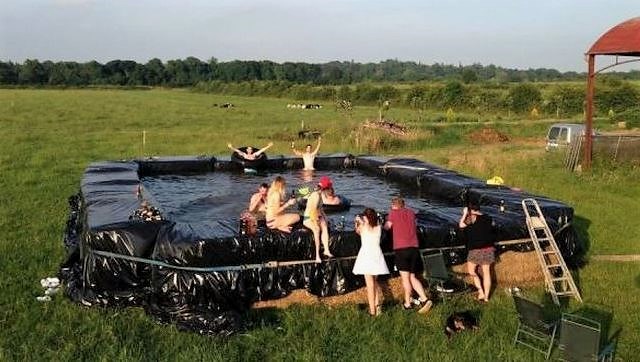
A pond made of hay - simple and cool
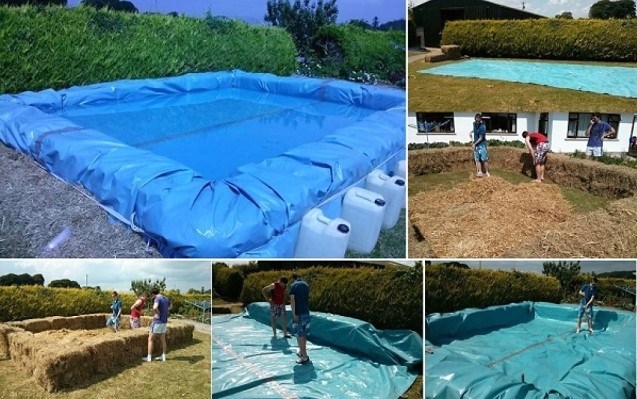
Looking for available materials for the construction of a swimming pond in the dacha sector, enthusiasts turned their attention to hay, which is an indispensable attribute of agricultural land.

It is spread out on a prepared area, and sides are built from rectangular compressed bales. Further, everything is according to the already shown scheme: a thick film is covered in the resulting bowl, the structure is tightened with belts. To protect the waterproofing film from damage, cardboard or a thick tarpaulin can be placed on the hay as the first layer.
Pool on a metal frame
For those who are familiar with welding, it will not be difficult to make a simple pool with your own hands from metal.
Each wall is made separately from a profile pipe and galvanized sheet. The structure can be assembled by welding or made dismountable with bolts.

An insert made of waterproofing film is installed inside, which, if desired, can be made to order according to the dimensions of the resulting structure. You can decorate such a pool using flooring from pallets, and also make a cover.

To increase ease of use, it is recommended to install a pump with a filter and use disinfectants for regular use. Thanks to this, your pool will not turn into a muddy swamp in a few days, the water from which will need to be completely pumped out and replaced with new water on a regular basis.
Mini-pool made from a large tire
Our selection will be completed by a very simple idea for making a pond from a large diameter tire from heavy special equipment.

To expand the future pool, the first step is to trim the sidewalls of the tire. The resulting workpiece is installed on a previously prepared concrete platform and filled with concrete. Thus, the tire and concrete form a bowl, which, after the concrete inside has dried, must be painted with a special paint.
As a result, you will get, albeit small, but not requiring much effort in maintenance and a very cozy pond that will help you cool off on hot days.
Every summer resident dreams of the early arrival of summer and imagines himself on vacation on sunny, hot days. In order to refresh yourself comfortably in cool water on vacation, you need to take care in advance about building or purchasing a bathhouse. Many owners refuse this idea, considering it too costly and time-consuming. In fact, any novice builder can make a small swimming pool at the dacha with his own hands. You just need to study different manufacturing methods, choose the appropriate option and follow the instructions step by step.
What available materials can be used to build a country pool?
You can, of course, buy one ready-made from expensive materials and invite a team of installation specialists, but often a modest budget does not allow for large-scale construction. Many summer residents give up, and the pond remains a pipe dream for them. But a thrifty owner will definitely find available and inexpensive materials and independently make a durable and beautiful pool that will last for many years and will become a real decoration of the site.
As you walk around your property, don't miss the following useful materials and things:

How to make a swimming pool at your dacha with your own hands - step-by-step instructions with photos
It is very important to choose a suitable location on the site to install the pool.

The choice of location has been made, now you need to draw a sketch with dimensions and mark the dimensions of the structure with pegs in place, and prepare the necessary tools.
For any type of pool, it is necessary to make a platform so that the bowl stands level and firmly all season.
Stages of foundation preparation:
- Remove the top loose layer of soil with grass, eliminate potholes, uneven areas, remove stones, debris, and uproot protruding roots. If you decide to deepen the bowl, then dig a pit with a reserve of space for the outer lining of the sides.
- Level the surface strictly horizontally, pour a small layer of crushed stone, and compact it thoroughly.
- If possible, cover with geotextile, which will protect the pool from gnawing by insects and weeds from growing under it, and will also strengthen and level the base.
- Pour a sand cushion 10 cm thick, lay insulation or a special polypropylene substrate under the bottom.
Making a pool from pallets
This structure can be built in less than a day and will cost very little.
For work you will need the following tools and materials:
- old wooden pallets, at least 9 pieces, depending on the size of the structure. They are made in standard dimensions 80x120 cm;
- level;
- roulette;
- pegs and cord for marking;
- jigsaw;
- planer for processing boards;
- boards;
- nails;
- hammer;
- screwdriver;
- screws,
- tie straps for fastening pallets into a single frame;
- film for lining the inside of the bowl;
- construction stapler;
- siding or finishing boards;
- felt;
- scotch;
- antiseptic impregnation;
- paint and varnish.
Installation steps:
- Prepare the site or dig a pit if you want to deepen the pool. Line it with polystyrene foam or other insulation to help the water warm up faster. Place a tarpaulin or mat on top.
- Treat all wooden elements with antiseptic and antifungal impregnation to prevent rotting and destruction of the wood.

Spread the substrate on the site and begin to mount the pallets sequentially
- Place the pallets vertically in a circular shape, with the boarding facing inwards, and knock them together using boards at the top, bottom and middle to form a single frame structure. Reinforce it with tightening straps, clamps or other available materials.

For reliability, secure the pallet structure using boards and special belts.
- Sheathe the inside of the structure with siding, cover it with boards, fill it with sand, and line the inside with waterproofing film.

Prepare the inside of the pool
- Then lay felt or old blankets and towels on the bottom and sides for softness, secure them with tape or a construction stapler.

Lay out old blankets and towels for softness.
- Cover the top of the sides and bottom of the pool with a finishing layer of film and straighten it. Blue material will look great. Nail the edges from the boards on top, securing and removing all protruding edges and edges. Now you can draw water and check the bowl for leaks.

Lay a film in the pool and cover the outside with finishing material
Tire pool
First you need to find a larger tire, for example, a BelAZ tire has a diameter of more than 300 cm and a width of more than 95 cm, and prepare the necessary tools and building materials:
- hacksaw or sharp knife;
- level;
- bag of cement M-300;
- water;
- sand;
- crushed stone;
- liquid soap;
- paint and any decorative elements;
- container for mixing the solution, drill with mixer attachment;
- shovel.
Stages of work:

The properties of rubber will allow you to enjoy such a work for many years without fear of leaks and destruction.
Film pool
This method is the fastest - it allows you to create a budget version of a bathhouse in two hours, which can be installed right in the garden. It should be noted that such an express bowl will serve until the first puncture of the film.
Step-by-step manufacturing instructions:

If necessary, such a reservoir is quickly removed until the next hot season.
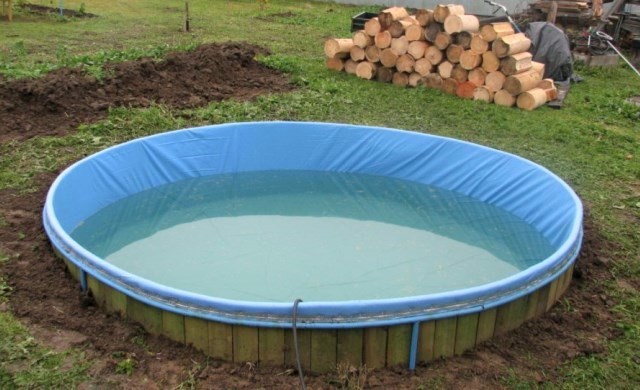
Swimming pool made of plastic pipes
There are ready-made prefabricated models of swimming pools on sale, the frame of which is made of PVC pipes, and the bowl is made of thick soft material or also of plastic. This design can be made on your own from pipes left over from repairs or purchased. They are inexpensive and are sold at any hardware store.
To work you will need:
- PVC fabric, which does not allow water to pass through and is used for making awnings and inflatable boats, it is very durable and is sold in various densities, an excellent solution for a homemade pool;
- shovel;
- sand;
- crushed stone;
- roulette;
- level;
- marker;
- an iron for soldering pipes or a construction hair dryer with a special nozzle for welding film;
- insulation;
- geotextiles.
Assembly takes place in several stages:

The bathhouse is usually small or medium in size; it can be disassembled in the fall and hidden in the closet until next summer.
Rules of care
In order for a homemade pool to last for several years, it needs proper care.

Having your own pool on your property is not a luxury item; it is quite affordable for an ordinary summer resident and can be made independently without significant financial costs. Thanks to the use of simple designs and inexpensive materials at hand, as well as simple rules for care and water purification, the pool will become a decoration of the dacha and will serve for a comfortable stay for more than one season.
Swimming pools in the country have long ceased to be a rarity. Only the sizes of such structures and their shape vary. It can be either full-fledged, fully equipped with appropriate equipment, or small, intended only for bathing children.
Types of country pools and their features
First you need to decide which of the country pools you plan to place on your site. According to installation methods, they are divided into:

Based on the materials used to make them, garden pools are divided into products made from:

It is better to protect a stationary pool with at least a simple canopy. In this case, less debris and fallen leaves will accumulate in it.
Filtration system
Without a high-quality filtration system, stationary garden pools will simply become overgrown with mud in a very short time. Depending on the method of water circulation in them, you can choose any of the cleaning systems:

Monolithic concrete pool for a summer residence
From durable reinforced concrete you can make both a small swimming pond and a full-fledged swimming pool equipped with modern equipment. But in both cases, the process of its arrangement is largely similar. We will describe in detail how to build a swimming pool at your dacha with your own hands from concrete.
Selecting a location and preparing the area
 To ensure that the water in the pool warms up as quickly as possible, it is placed in an open space, away from tall buildings and trees that block the sun. Close proximity of vegetation is also undesirable because in the fall, falling leaves will clog the pool, and it will take much more time to clean it. The growing roots of such powerful plants as poplar, willow or birch can easily destroy even concrete.


