Almost always, when drawing any landscape, a tree appears as the main or additional object, and sometimes even more than one. Before you start drawing an entire grove or even a forest, you need to learn how to draw a single tree, and also practice drawing different types of trees.
In this tutorial I want to demonstrate how to paint different types of trees using different techniques. It is very important that the paints are of good quality. Using low-quality paints will make it difficult for you to control your work with paint, and in general the whole process will not bring much pleasure, and the result will most likely be extremely mediocre.
So, I will show you how to paint a winter spruce, a deciduous tree, and also a technique for painting a tree with a sponge. Let's start.
How to paint a spruce with paints
First, let's designate the trunk. It shows in which direction the side branches grow. Important - if you paint not with gouache, but with watercolor, then you will need to make a preliminary sketch with a pencil and start painting from the light areas, then wait until the paint dries and move on to the dark details. If you don't do this, all the paint will mix and you'll end up with a very messy, unsightly painting. By the way, here is a detailed description of the technique of painting flowers with watercolors.
After you have finished drawing the branches, we outline the main color of the coniferous foliage of the tree. In some places the paint will be a little lighter. Draw the darkest areas in green with the addition of blue - you should get a sea green color.

To add snow to the spruce branches, wait until the paint is completely dry. We paint snow with white paint with the addition of a blue or light blue tint.

How to paint a deciduous tree with paints
Again, we start drawing from the trunk, from which the branches are directed as shown in the image below.

Here for the foliage we will use a warmer green - you can get this color if you add a little yellow to the usual green - this way you can adjust and change the shade. The more shades of green there are in your drawing, the more interesting the final result will look. We paint the shaded areas with dark green and turquoise.

Individual, strongly illuminated petals can be indicated in yellow. Don't forget to paint the trunk with dark and light shades of brown. Also draw the soil, grass and flowers at the base of the tree.

How to paint a tree with paint and sponge
This method is especially popular with children and novice artists. It will require paper, paint and a small piece of sponge or foam rubber.
We start drawing from the trunk. Using light movements using a thin brush, draw the branches.

After this, you need to dip the sponge a little in green paint and carefully leave prints on the paper in the place where the tree crown should be located. You can practice on a rough draft. Adjust the amount of paint and pressure to get the best effect.
We present to you another interesting step-by-step lesson on drawing with pencils. Today we will show you how to draw a tree with pencils. Prepare all the materials necessary for drawing:
- a sheet of white paper in A5 or A4 format;
- colour pencils;
- simple pencil HB;
- eraser.
We start by sketching the tree trunk.

Then we move on to drawing the crown. We apply the sketch easily, without pressing too hard on the pencil and without drawing any details.

Now let's return to creating the trunk. We outline its outline with a brown pencil.


Gradually giving it contrast and brightness.

The crown of the tree should be green. To do this, take a pencil of any green tone and begin to draw each piece of the crown.

Don't press too hard on the pencil so that you end up with a translucent shade like this.

Now we begin to draw in small strokes the unpainted areas of the crown.


To do this, you can use a different shade of green pencil that is darker or more saturated. You can also draw with one green pencil, just change the pressure on it.
Using a burgundy pencil we create bright accents on the trunk of our tree.


We outline the outline of the trunk, easily draw the middle and side parts of the branches.
To create contrast and draw the shadows of the trunk, we use a black pencil.


Now we create these small leaves along the contour of the crown.

The petals should have a richer tone and stand out a little from the background of the main part of the crown.


And then we outline the outline of the miniature leaves with a yellow pencil.


We create crown contrast with a burgundy or brown tone. Fill the dark areas of the foliage with any of these two shades.


In the background of the picture we will create a wooden fence of a translucent color. We will also draw a small area of green grass under the tree.

That's it, the work is ready!


Plants are one of the most interesting creatures on our planet; they can be studied endlessly and each time you discover amazing and entertaining details. Take an ordinary twig – it would seem, what’s unusual about it? But the point is that you see an ordinary branch with leaves swaying in the wind, but in fact at this moment there are many complex processes going on there related to the processing and accumulation of solar energy, moisture evaporation, and so on.
In this lesson I would like to tell you in detail how to draw a twig with a pencil step by step. We have already tried , and , but we didn’t touch on the question of how to draw exactly the branches.
In fact, I’m not a big fan of drawing nature - I like it better, but nature very often becomes the object of modular paintings that look simply amazing - such a trick won’t work with a drawing of a person. Therefore, we conclude - any beginner and experienced artist should be able to draw nature, so let's learn together.
So, let's start drawing the twig. We will need paper, a pencil and an eraser; you can also add paints, markers, colored pencils and crayons to this set, but they will only be needed at the final stage. I use a graphics tablet and an editor on my computer, and you can try it too - for example, draw a twig in SAI with the mouse.
First of all, we create such a light sketch that will determine the direction of the branch, its size and the number of branches. Make light pencil lines so that they can be erased later.
Now we add shape and volume to the branches, making them thicker. Few trees can boast of perfectly smooth branches, so the surface does not have to be super smooth.


Add leaves to the other part of the branch.

You can add flowers if you are drawing a flowering tree, such as sakura or an apple tree. And this is how we got it.
I am sure that almost all of you are interested in the topic of creating landscapes. Landscapes can be very different, showing beautiful and interesting views of different parts of our planet, in many of them you come into contact with the task of depicting trees. How to draw a tree that is alive, beautiful and natural is the topic of our lesson today.
Trees are not difficult to draw, but sometimes they come out too drawn or flat.
Basic mistakes
The main mistakes in drawing trees are:
Lack of volume
The lack of volume in a drawing (in color or black and white) is achieved by using paints of different tones and intensity. Even on a cloudy day, some part of the crown and trunk will be more shaded, and some less. The colors are always darker in the thick of the foliage. Think of a tree as a ball (crown) and a cylinder (trunk) to understand how shadows form on this complex shape.
Here are examples:
Too regular and unnatural forms
To avoid this mistake, gently draw trees easily and quickly, and if your hand trembles somewhere, it will be more natural than when all the lines are very folded and dewy. In nature, you will not find completely identical trees, a perfectly symmetrical crown or trunk. Something always stands out from the general order. Something always stands out from the general order, and this is what gives the tree (plant) and your drawing more liveliness and naturalness.
Naturally, this rule does not apply to trees and bushes, the shapes of which are shaped by gardeners.
Advice: Before you start drawing a forest or a park alley, practice drawing trees and bushes separately on a sheet of paper, so that you can begin to draw them easily and naturally. It is important that you can quickly outline the trunks and branches, this will help avoid “loneliness” in your work. After training, move on to a more serious task.
Drawing step by step
There are a huge number of trees in nature, each with its own character. Let's try to depict different types of trees step by step in order to better understand the process of creating such a drawing and some of the nuances.
Determining the General Shape
The main thing is to correctly determine the general shape of the tree, its crown and trunk. If it is somehow tilted or rotated, then at the very first stage it is important to note this direction.
The initial sketch may look very primitive, but it is important that you can already guess from it what kind of tree or bush it is. No details are needed or important right now.
Clarifying the silhouette
A clear shape and correct direction (turn, bend or tilt), a good basis for some detailing and clarification.
Now, we can clarify the silhouette of the crown, some small protrusions of branches, show gaps, clarify the placement and direction of branches on the trunk and among the foliage. 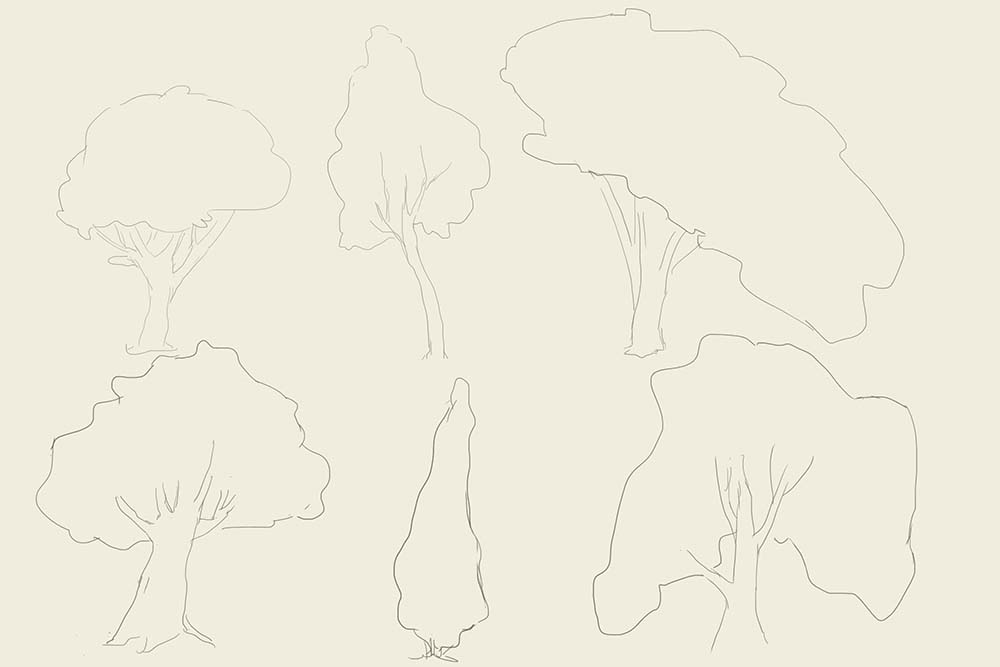
Remember that trees that are too straight and symmetrical will not look natural.
Adding general tone and color
The sketch is ready and now we can pick up paints or a pencil and give the tree more expressiveness and volume.
If you work with any paints (except watercolors), then the crown and trunk can be immediately painted with a common color, without showing light and shadow.
At this stage, it is important to choose a good shade for the foliage and trunk, characteristic of this particular type of tree and corresponding to the lighting.
Spots of light and shadow
After the main colors have been selected and applied, it is worth adding some volume. To do this, depending on the lighting, you need to show shadow and light throughout the entire crown, without highlighting the branches and the trunk.
Also now you need to mark the shadow on the trunk, depending on the location of the sun.
In the illustration above, we assumed that the sun is above and to the right. Accordingly, shadows on the trunks formed on the left side.
Small shapes and details
When the overall volume is shown, individual branches, clusters of branches, depressions and gaps between leaves can be highlighted. If there is a need, you can highlight some leaves in the foreground, this will create a feeling of greater detail.

You shouldn’t draw out every leaf, as this will make the picture look like a child’s picture. After all, when we look at the forest, we see the overall picture, and only by looking closely, concentrating our attention, can we look at individual leaves.
Trees without leaves
During the cold season, trees remain without leaves; this is also an interesting topic in fine art. Drawing dry branches is a good practice for any artist, since here you need to correctly show the volume, direction, shape, angle and perspective.
Each type of tree has a different arrangement of branches; this must be taken into account. Some trees have small branches, with many bends, and they are located close. Others, on the contrary, have long, straight branches with a minimum of branches. Also pay attention to the shape of the crown without leaves.
Video lesson
Watch the lesson on how to draw a forest, tree, trees step by step with a pencil:
Examples for inspiration
 Claude Monet, Olive Trees in the Moreno Garden
Trees quite often become the subject of children's drawings. What picture of nature would be complete without trees? But trees are not as easy to draw as it seems, so it is better for novice artists to draw a tree step by step and first with a simple pencil. And only after completing the drawing with a pencil correctly, it will be possible to color it with paints. It is quite difficult to draw branches in a tree. They should be evenly spaced along the trunk and stretch upward towards the sun, and also have many small branches of branches inside. To make the tree look more beautiful in the picture, make the crown and trunk of the correct shape.
First, mark the lines of the branches, then make them almost invisible in the crown of foliage. The easiest way to learn how to draw a spruce. It has a fairly simple structure, but we will try to make the task more difficult. In this lesson we will draw a tree, step by step with a pencil.
1. Let's mark the tree trunk

First we need to mark the base of the branches and trunk. To do this, draw two main vertical lines in the middle of a sheet of paper. From them we will make branches for branches stretching upward, but at the next stage.
2. Contours of the main branches

Try to make the contours of the branches at slightly different distances from each other so that you do not end up with strict symmetry, which practically does not happen in nature.
3. Add small branches to the drawing

Further, from these main branch branches you need to make many more branches, of which there are many on any tree. But in our drawing everything is conditional, therefore, we should not draw too many of these branches. Don't do them symmetrically either. Leaves will be drawn on these future branches.
4. Let’s finally draw the entire tree, except for the leaves.

Using the preliminary contours we will outline the actual dimensions of the trunk and branches. To do this, outline the main line with two others, but not so smooth, since the surface of a tree is only smooth on a pole. We will do the same with the branches, only we will add along one line, since there is not necessarily a perfect similarity. Draw many bunches on the trunk; they will be branches facing us. This is very often forgotten, and tree drawing turns out flat. At the next stage, we will determine the size of the leaves of our tree and outline the counter for the future crown.
5. Draw tree leaves

Drawing tree leaves is not so much difficult as it takes a long time. Firstly, they are small, and secondly, there are a lot of them and, if possible, you need to draw each leaf separately. To quickly draw the leaves of a tree, draw small elongated ovals, just make sure that they do not go too far beyond the general contour of the tree. Draw them according to the location of the branches, and do not leave spaces between them.
6. Pencil drawing of a tree

If you draw only with a simple pencil, then add a few more small details, shade the tree trunk, and remove unnecessary strokes from the drawing. And to make the black and white drawing of a tree more picturesque, you need to add small details surrounding the tree. For example, draw grass next to it, use dark strokes to depict the shadow of a tree crown, etc.
7. Drawing trees with paints

This tutorial is about how to draw a maple leaf. But, if you draw other trees, this lesson will help you draw the leaves of any trees correctly.
Try to draw a flying parrot. In the future, if you can draw a parrot correctly, you will be able to draw any birds, even the firebird. It is best to draw it against the background of tree leaves.
If you draw a forest, you can also draw mushrooms. Mushrooms will be a good decoration for your drawing, especially if you color them with colored pencils.
A Christmas tree often needs to be drawn for a New Year's card or wall newspaper. If you draw a New Year tree, you can also draw Father Frost and Snow Maiden. There are such lessons on the site.
An apple tree is practically no different from an ordinary deciduous tree, only its branches are always widely “scattered” and bend towards the ground, since in a good year heavy apples bend them to the ground.
The house can be drawn in many different ways, such as making a tile roof, drawing double doors, or adding a brick chimney for the fireplace. It depends on your desire, but any house must have a foundation, walls, a roof and doors with windows. When drawing the surrounding landscape around the house, you can’t do without drawing trees.


