In order to keep the apartment warm and comfortable during the cold season, it is necessary to install the batteries efficiently. An important step is the correct connection of all elements. The norms and basic rules are prescribed in the legislation, and it would be useful to familiarize yourself with them. If you have the desire and opportunity, you can do the installation yourself.


Features and types of heating systems
How warm the apartment will be depends on what type of heating system is installed in the room.
They can be divided into 3 main types according to the connection diagram:
- single-pipe;
- two-pipe;
- collector
As for the one-pipe system, in this case the coolant flows through one pipe to all batteries, and ultimately returns through it after it has cooled. This option is the easiest to install, and for this reason it is used in all multi-storey buildings. However, there are also disadvantages, in particular, when moving to other radiators, the coolant cools down more and more, and accordingly, less heat enters the room. In addition, you cannot disconnect only one battery for repairs; in this case, you will have to shut off the entire riser.


With a two-pipe system, the coolant flows through one pipe, but separately to all batteries. In this situation, all radiators are heated evenly, and the cooled water goes through a separate pipe into the boiler, where it is heated again. If replacement is necessary, there is no need to disconnect the riser; it is enough to shut off only one battery, which simplifies the work compared to the previous option.
The system using a collector is used mainly in cottages and is much more complex. In this case, separate pipes go to each radiator. Installation of the system on your own is impossible; the work of specialists is required.


The batteries themselves, depending on the material of manufacture, can be:
- bimetallic;
- aluminum;
- cast iron;
- steel.
Bimetallic include elements made from various metals and are often used in apartments. They have good heat transfer, are easy to install, but have a fairly high price. Working pressure – 35 atm.
Aluminum batteries also do not create installation problems and dissipate heat well. Due to pressure up to 18 atm, they are often installed in multi-storey buildings. Radiators are resistant to corrosion, but they cannot be installed with copper pipes, as the bases may react, leading to the destruction of both elements.


Cast iron batteries are most often used in old housing stock, where there are few floors, since their pressure reaches only 12 atm. They are installed quite rarely in apartments. Radiators have significant weight, which creates difficulties during installation; in addition, they heat up and cool down for a long time. Among the advantages are their strength and long service life.
Steel radiators are reasonably priced and suitable for apartment buildings. Among the disadvantages, consumers note a short service life - about 15-20 years. And also in this case there is no possibility to expand additional sections. Easy to install and can be installed with any pipes.


Depending on the material of manufacture, differences appear in the installation process of radiators. Due to their strength, cast iron heating elements are more resistant to mechanical stress; others require careful handling. Installation should be carried out exclusively on walls made of brick and concrete; if there is a plasterboard wall nearby, a special stand is required.
In modern models it is necessary to provide a Mayevsky tap.


Connection methods
SNiP prescribes the basic rules for installing heating radiators. The ability of the radiator to withstand pressure is important. The manufacturing material should not react with the pipes that are supplied to the product in order to avoid corrosion processes. The battery should be placed 10 centimeters below the protruding part of the window sill to release heat flow.
The distance between the floor and the bottom of the radiator should be more than 10 and less than 15 centimeters. This is a fundamental issue, otherwise the processes of uniform heat transfer will be disrupted. All sections must be connected evenly and have no significant differences in height.


In order for heat transfer to occur most efficiently, it is important to place the heating radiator correctly. Experts recommend placing it under windows in order to minimize heat loss through these areas. If there is an external cold wall, it is recommended to place additional devices on it.
In general, batteries in an apartment can be located in several ways:
- lateral location;
- lower;
- diagonal;
- sequential.
The most popular is the side arrangement of batteries. It is characterized by high heat transfer. The pipe through which hot water flows is inserted into the upper pipe, and the outlet comes from the lower one. In the case of bottom placement, both pipes are located at the bottom. The diagram is relevant if the pipes are located in the floor or under the baseboard.


Diagonal is used when the battery has a large number of sections, 12 or more. The coolant enters through the top pipe and exits from the bottom. Consistent is relevant when the plumbing system has sufficient pressure so that hot water passes through all radiators.
In cases where it is necessary to install an additional radiator, the coolant must first be removed from the system. After securing the brackets, the radiator is attached, the connections are secured with a special key. You need to install a Mayevsky tap on the free hole, and close all the others with a plug. Next, you should attach the battery itself and carefully align it. After this, the remaining elements are brought in and everything is connected into a single system, which must be absolutely sealed.


Substitution rules
There are times when radiators need replacement.
This can happen in two situations:
- battery failure;
- replacing old radiators with new ones.
In the event of a breakdown, it is necessary to notify the Housing Office and the Department of Economic Protection. Representatives of these organizations are required to visit the apartment, conduct an inspection and confirm that it is impossible to restore the old radiator and it needs to be replaced.


It may happen that during renovations or for other reasons, residents decided to replace old heating radiators with more modern models. In this case, the owner must be ready to undergo approval measures. Batteries cannot be replaced without the consent of the management company and documents confirming this fact.
Representatives of the above organization must take part in the work process, otherwise such actions threaten a number of problems.


IN First of all, the parameters of the heating system of the whole house may change. In addition, in order to install a new radiator, it is necessary to shut off the entire riser, and this action can only be performed by employees of the management company. If you do this yourself, the violator may face a considerable fine. But you also need to know the temperature regime, which will directly affect how much heat the device will give off, and, accordingly, the favorable microclimate in the room.
After completing all the documents, you can purchase the necessary elements and devices. Next, the installation date is agreed upon, in accordance with which the work is carried out. Our specialists will help you properly connect, configure and run your heating system.


Preparatory work
Before starting work on installing heating devices, you need to clarify the type of wiring by which the system is organized. This determines which parts and in what quantities will be required during the installation process. The work site should be prepared, as well as the necessary tools.
The first thing to start with is blocking the riser. If there are old batteries, they need to be disconnected, drained of all water, and then disconnected from the heating system.
If necessary, you should use a pump, which can be used to remove as much liquid as possible from the radiator.


When the coolant is removed, you should determine the places where the heating element will be attached. Next, the brackets are installed. You will need 2 or 3 of them to secure the top of the battery, as well as a pair to hold the bottom. The location of the brackets must be checked using a special level. After this, the site can be considered ready for work.


Installation
After the preparatory work has been completed, you can begin the direct installation of heating devices that need to be placed on the brackets. If the installation of the brackets is done correctly, the rear wall of the radiator will fit closely to the supports and will be securely fixed to them. When installing the battery itself, you need to take into account that it is necessary to maintain a slight slope, which will be about 3 millimeters per 1 meter of the heating device.
The batteries are installed, pipes and fittings are connected to them, and all this is carefully secured. How well the work is carried out will determine how tight the system will be. Next, you can open the riser and fill it with water. This will allow you to check how tight the connections are.


When installing heating devices with your own hands, you must pay special attention to the installation of shut-off and control elements. The installation of a Mayevsky tap is mandatory, because it is he who will subsequently play the main role in bleeding air at the beginning of the heating season. The element should be located near the highest point.


When working with a one-pipe system, it is necessary to install a bypass, which has a valve, in contrast to a two-pipe system, when the connection occurs only with the discharge, which also has a valve. The bends are attached to the pipes using torque wrenches. Such keys are not included in the kit; when installing a radiator, specialists bring this tool with them. If the work is carried out independently, you will need to buy keys, since the work cannot be completed without them. This element ensures reliable tightening of fasteners.
Independent installation of heating devices is a task for which you need to carefully prepare. The slightest violations of a process that seems simplest to an amateur often lead to negative emergency consequences. Therefore, it is advisable to entrust the replacement of batteries in city apartments to plumbers, on whose powerful shoulders the entire burden of responsibility will fall, and in a private house, installing heating batteries with your own hands can be successfully done by the owner. However, in order to avoid having to repair floors and re-glue wallpaper after a hot “flood”, you should familiarize yourself with information about the basic rules and nuances of installation.
Preparatory stage of work
The first step is to find out what type of wiring was used to organize the heating system. The owners who arranged it themselves should know whether the heating network provides heat to their country property.
Before installing a radiator, you should find out whether there is a single-pipe or two-pipe heating circuit in the house; the choice of parts and their quantity depend on the wiring diagram
Parts required for installation
Depending on the design features, parts are selected. For a battery built into a single-pipe heating system, it will be necessary. This element will allow, in the event of any malfunction, to turn off only the device equipped with a bypass without shutting off the entire heating system, which is extremely undesirable in frosty weather.
The connection diagram and type of radiator also determine the number of connecting and functional elements necessary for proper installation. Adapters, couplings, nipples, and corners are selected according to the diagram and dimensions.

An inexperienced performer should not get carried away with parts for installing a radiator that are unnecessarily difficult to install: 1) corners, 2) radiator stop valve, 3) “American”, 4) valve with American
The future installer will also need shut-off valves. It is recommended to choose the radiator type of shut-off valves, without getting carried away with overly complex ball valves with “American” designs, which require professional skills from the performer. Ensuring tightness without experience is problematic. To connect the battery to the pipeline, you will need fittings with threads corresponding to the size of the radiator and pipes. A sleeve will also be screwed onto the leads, which is then twisted and inserted into the battery.

With the help of squeegees, it is easier and easier to connect the radiator to the heating circuit - there is no need to weld the joints of the supply line and the pipeline
It is important to note that when purchasing for installation, you must first check whether the included brackets match the type of material from which the walls are built.
In order to be able to bleed air from the battery, it must be equipped with a Mayevsky valve. Usually it is included in the factory configuration, but if it is not available, you will definitely need to buy it.

An important part necessary for the correct installation of the heating radiator is the Mayevsky tap, which is necessary to bleed air from the device
How to calculate location?
Those wishing to install the radiator themselves should know that the sections of pipes leading to the devices must be positioned with a slight slope directed towards the direction of movement. In the case of a strictly horizontal installation, as well as in the case of a slight misalignment in the installation of the radiator, air will “collect” in steel or cast iron batteries. It will have to be constantly blown out by hand to avoid a decrease in heat transfer.
It is desirable that the central axis of the radiator coincides with the axis passing through the center of the window opening. Deviations of 2 cm are permissible, which are absolutely not visually detectable. This recommendation is not a strict requirement.
The list of strict rules:
- The supply elements to heating devices must be located so that the slope is 0.005; it is recommended to increase it to 0.01. That is, one meter of pipeline must be inclined towards the circulation by at least 0.5 cm. The angle of inclination should be calculated according to the length of the installed pipe sections.
- From the floor plane to the battery 6-10 cm or more.
- From the bottom line of the window sill to the top line of the radiator 5-10 cm.
- From the wall surface to the radiator 3-5 cm.
When installing a radiator, it is imperative that the horizontal and vertical directions be observed.

Norms and rules for installing a heating device: distances from the floor, walls, window sill
In order to increase the performance of the radiator, a specialized shield made of heat-reflecting material can be installed on the wall behind it before installation. You can simply coat the wall surface with a composition with similar properties.

For aesthetic and technological reasons, radiators in one room are located on the same level
Marking batteries with brackets
The sectional principle of selecting heating devices allows you to accurately determine the number of sections required to heat a room with specific technical conditions. Information about payment rules must be found and studied before purchasing. But according to the installation rules, 1 m² of radiator heating surface area is equipped with one bracket.

Brackets for mounting radiators: homemade at the top, factory at the bottom; if desired, a home craftsman can easily make them with his own hands, by analogy with factory-made battery mounts
So here's what you need to do:
- Taking into account the above rules, we mark the installation points of the brackets.
- Before drilling holes, check all distances again.
- We insert dowels into the drilled holes, into which we then screw the fasteners.
If the markings were made correctly, the battery will “lie” tightly on all installed supports, firmly resting on each of them. Further installation of the radiator with your own hands involves connecting the device to the communication system.
Tools and Supplies
The performer will need torque wrenches with dimensions that allow the torque to be maintained with high accuracy. Since the coolant moves through the system under pressure, insufficient tightness will lead to the appearance of a jet from the connection point. Excessive tightening will cause thread failure with similar consequences. Therefore, you should carefully follow the instructions included with each device. They indicate the value of dynamometer torques.
You will need to stock up on sealant, tow soaked in oil paint, or special sealing tape.
The installation process itself
Before starting work, it is necessary to completely shut off the heating circuit, drain the water from the system, and the pump will help remove any remaining water efficiently. Using a level, carefully check the battery hung on the supports vertically and horizontally.
- You need to unscrew all plugs from the device.
- Connect a valved bypass, which is only required for a single-pipe circuit. To connect to a two-pipe circuit, a bypass is not needed; only a squeegee with a valve connected to it is used for connection.
Using threaded connectors, we connect the battery to the system, using tow or another sealant to seal the joints (if you have experience in welding, the joints between the connectors and the pipeline can be welded).
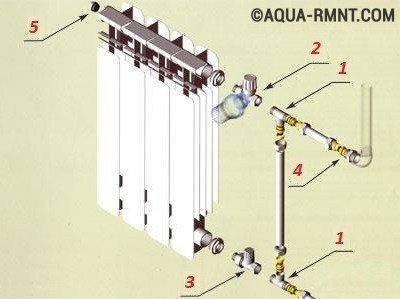
A bypass is required for connection to a single-pipe circuit - connection diagram: 1 - tee for metal-plastic pipes; 2 - direct control valve; 3 - direct shut-off valve; 4 - adapter for metal-plastic pipes; 5 - rotating valve for air release
It is important to note that until the installation of the devices and devices is completed, it is not necessary to remove the packaging shell.
Installation is complete, but more is needed. To do this, you will need to call a plumber. Both his experience and the device will be useful, which does not make sense to buy for the sake of installing several batteries.
Specifics of installing a cast iron radiator
No matter how intensively innovative battery manufacturers promote their aesthetically pleasing ultra-light aluminum and bimetallic products, many cast iron adherents remain. The material, which is not pleasing with grace, retains heat for an incredibly long time, gradually transferring it to the heated space. Those wishing to learn how to properly install a heating radiator made of heat-intensive cast iron should familiarize themselves with the specific design features of the device and its installation:
- Before installation, the cast iron battery will need to be unscrewed, the nipples adjusted, and then the device reassembled. Disassembly is carried out on a workbench, using a pair of radiator keys inserted into the nipple holes. To increase the applied force and to secure it, a crowbar is inserted into the eye of the key intended for unscrewing the lower nipple. To avoid distortion, both nipples located at the top and bottom are unscrewed at the same time. It is more convenient to do the work together. When unscrewing a cast iron radiator, pay attention to the direction of the thread. On different sides of the cast iron radiator there are threads in the opposite direction. Unfolded? Remove the section.
- By analogy, you need to screw together all the sections, and then group them in strict reverse order into a single device with the number of sections required to heat a particular room. The assembled battery must be pressurized, and if a leak is detected, the nipple must be adjusted in the problem area.
- Wall-mounted cast iron batteries can be fixed on brick and foam concrete walls. Walls made of wood will not support the weight, so the owner of a wooden house will need radiators with special floor supports. However, supporting fasteners must also be installed on the walls.
- Since private houses mostly have single-pipe heating, a bypass is installed. The connection diagram must include a Mayevsky tap and corresponding shut-off valves.
Connection to the pipeline is made using threaded fittings. It is better not to use a welding machine in wooden buildings.
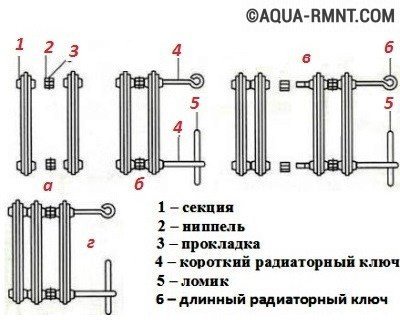
Technology for unscrewing and assembling cast iron batteries: a – nipples capture the threads of sections (2-3 threads); b – tighten the nipples, join the sections; c – install the third section; d – two radiators are grouped

The difference in the schemes for attaching a cast iron battery to walls made of different building materials:
a) wooden wall: 1) support strip, 2) stand
b) brick wall: 1) window sill, 2) niche, 3) brackets
Whether or not it is worth saving on installing batteries is a personal matter for the owner. Essentially, there is not a single particularly difficult moment in the installation technology. By strictly following the sequence, knowing the rules, having studied the information on how to install a heating radiator, you can safely get down to business with hands that confidently hold radiator, torque wrenches and other tools. True, confidence alone will not be enough to achieve success. Strict adherence to installation rules and the formation of perfect tightness, guaranteeing a complete absence of leaks, will definitely help.
To keep your home warm, you must correctly install the heating system. At the same time, it is important not only to carry out the required set of works efficiently, but also to correctly connect all the heating elements. It is necessary to take into account the current standards for the number of heating elements for a room of a certain area. If you wish, you can do everything yourself.
Is assembly required?
If the radiators are supplied assembled, it is enough to install plugs and. Most models have four holes located at the four corners of the body. They are used to connect heating lines. In this case, any scheme can be implemented.
Before installation of the system begins, it is necessary to close excess holes using special plugs or air vent valves. The batteries are supplied with adapters that must be screwed into the collectors of the product. In the future, various communications should be connected to these adapters.
Prefabricated models
Assembling batteries should begin by laying the entire product or its sections on a flat surface. Best on the floor. Before this stage, it is worth deciding how many sections will be installed. There are standards that allow you to determine the optimal amount.

The sections are connected using nipples having two external threads: right and left, as well as a turnkey lug. The nipples should be screwed into two blocks: at the top and bottom.
When assembling the radiator, be sure to use the gaskets supplied with the product.
It is necessary to ensure that the upper edges of the sections are correctly located - in the same plane. The tolerance is 3 mm.
Features of installation of various types
The material from which a particular heating element is made imposes certain requirements for its installation. While cast iron is not afraid of serious mechanical stress, others require special care.
Cast iron classic
Still remain relevant. The special characteristics of the material used in their manufacture make it possible to effectively heat a room of any size due to slow cooling.
To install such a heating element correctly, before connecting you should:

- disassemble the finished product into sections;
- Having pulled out all the nipples, reassemble the product in the reverse order.
When performing installation work, it is worth taking into account the weight of the product and the composition of the material from which the house was built. The heating element can only be installed on brick and concrete walls. near a plasterboard wall is placed on a floor stand.
Modern models
Such products are characterized by low weight and increased fragility. For them it is necessary to provide a Mayevsky crane.

During installation work, do not remove the packaging to prevent surface deformation.
How will we connect?
The connection diagram for radiators may be different. The level of heat transfer and the comfort of staying in the apartment depend on which option is preferred. Incorrectly selected wiring can reduce the power of the heating system by 50%.
Lateral
The most widespread is the one-sided side scheme, characterized by the highest heat transfer rate. In this case, the coolant supply pipe is connected to the upper pipe, and the outlet pipe to the lower one.

If you do the opposite, the efficiency of heating the room will decrease by almost 7%. For connecting multi-section radiators, such a scheme is not always justified, since insufficient heating of the last sections is possible. This can be avoided by installing a water flow extension.
Lower
In an apartment with pipes hidden in the floor or running under the baseboard, a bottom connection is used.

This is the most aesthetic option, in which the pipes for supplying and discharging coolant are located below in the floor, and therefore the lower holes are used for connection.
Diagonal
Batteries with twelve or more sections are installed in a diagonal pattern.

The coolant is supplied through the upper pipe located on one side of the radiator, and is discharged through the lower pipe on the other side.
Sequential
This connection diagram assumes that there is sufficient pressure in the heating system for the coolant to move through the pipes.

In this case, it is worthwhile to provide a Mayevsky valve designed to remove excess air.
It is important to remember that repair and maintenance work will be accompanied by shutting down the entire heating system.
Parallel
Parallel wiring assumes the presence of a special heat pipe built into the heating system, through which the coolant is supplied and discharged outside.

The presence of special taps at the inlet and outlet makes it possible to replace individual radiators without turning off the heat supply. However, the circuit may cause insufficient heating of the pipes at low pressure in the system.
Sequence of work
Installation of batteries begins with complete shutdown of the circuit. When replacing old radiators with new ones, the water is drained and the heating elements are dismantled. It would be correct to use a pump to eliminate the presence of coolant residues in the system.
After all the water has been removed, the mounting location of the batteries is aligned in both planes. Brackets are installed.
Package
The next step is to pack the radiators using sealing flax, packaging paste or special shut-off valves. Using a torque wrench, tighten the connection, creating the force specified in the documentation.
Installation work
Installation of radiators on the wall is carried out by welding or polypropylene pipes. In the first case, it is enough to use two fasteners; in the second, at least three are required. Two should be at the top, one at the bottom.

With ten or more sections, the number of fastenings should be increased to five. There should be three at the top, two at the bottom.
Spatial location control
The position of the batteries is monitored in both planes. It is advisable to provide a slight slope towards the wall. This will avoid airing the system during its operation.
The final stage
Threads are cut on the risers and all elements of the heating system are connected. The tightness of all connections is carefully monitored.

Test tests can then be carried out to detect possible leaks.
Tests
If until now everything was done with your own hands, at this stage it is better to invite a mechanic of the housing and communal services. By turning off the American taps, you can open the connecting tap. It is better to leave the opening of the return pipe to a mechanic.
If there are no leaks at the connection points, it will be possible to open the valve on the batteries and close the bypass valve. The coolant will begin to flow into the heating system. To bleed air, you should use the Mayevsky tap.

Once the heating circuit in all rooms has warmed up, the plumber will open the straight pipe. This will restore pressure in the system. The control tests can be considered completed. If the installation was done correctly, the apartment will be comfortable at minimal cost.
The need for proper installation of heating radiators arises both when replacing a single device and when installing the entire system. It is the latter option that is reasonable to consider in detail and in detail.
The heating season in our country lasts at least six months, so a lot depends on the heat circulation system: not only the comfort of living quarters, but also human health, heating costs and the relevance of its repair. Let's consider the main schemes for supplying heat to apartments and residential buildings:
- Cast iron radiators. Massive classic devices, “guests from the past.” They are used on a residual basis and are no longer produced by modern industry. They are characterized by low heat transfer and an appearance that has to be decorated - curtains, slats, etc. Which further reduces the circulation of warm air in the room;
- Aluminum sectional radiators. Lightweight, reliable and efficient devices for the heating system. Approximately 50% of the coolant energy comes from convection into the room (for cast iron analogues this figure barely reaches 25%). Equipped with convenient pressure/flow regulators and an attractive design;
- Steel sectional radiators are very similar in appearance to aluminum ones - but at the same time they are much more massive and somewhat more expensive in terms of price. The main advantage of the design of steel heating devices is their high resistance to corrosion. If the water in the heating system is hard and contains acidic or alkaline impurities, it is wise to choose such batteries. The installation of steel heating radiators must take into account their significant weight;
- Bimetallic radiators - have the best performance characteristics and the highest cost (about 20% higher than aluminum sections). They withstand high pressure in the system, operate in the range from 20 to 40 atmospheres. All other varieties described above can operate at a water pressure in the system of 15–25 atmospheres.

The standard service life of bimetallic radiators is up to 25 years, steel and aluminum - at least 20 years. In reality, they can last up to half a century. Of course, under the obvious condition - if the system is selected and connected correctly.
When replacing a single heating device (for example, the cast iron sections are leaky), it is important to pay attention to the center distance, hole diameter and thread pitch. It is best to measure these parameters with a tape measure and calipers. There are many types of heating devices on the market and in stores, their design features differ from each other. You can purchase a device that looks like a failed battery, but it will not work during installation.
When the entire system is changed, or heating is installed anew (for example, in a new house or apartment), a correctly drawn up project is important:
- For pipes – direct and return – it is best to choose plastic ones with a metal layer, used for hot water supply. In the specifications, the permissible water temperature must exceed the temperature in the system by at least 10 ˚C;
- The best places to install the selected heating radiators are the space under the windows or on one side of long blank walls. This ensures better circulation of warm air in the apartment/house;

- The sectional design of the batteries allows you to vary their length, and therefore the power of the heating system. Correct connection requires the presence of from 6 (minimum) to 15 (maximum) sections per radiator;
- The average standard per 1 square meter of heated room is 0.7–1.1 sections made of aluminum, steel or bimetal. In rooms with an area of more than 15–20 m2, installation is recommended;
- In addition to the main pipes and the batteries themselves, you should stock up on the required number of connecting fittings, angles, brackets and other accessories. To drill holes in ceilings and walls, you will need a hammer drill with a long drill and a special “iron” for welding PVC pipes.

Of course, all installed batteries must be from the same company (and preferably from the same batch). Similar requirements apply to the pipeline system. Let's look at how to install a heating radiator and connect it after installation in more detail.
The site’s site masters have prepared a special calculator for you. You can easily calculate the required number of sections.
Installation and connection of radiators - step-by-step instructions
The installation of new heating radiators should be divided into several stages:
How to install and connect heating radiators with your own hands - step-by-step diagram
Step 1: First things first – batteries!
When installing heating radiators on the wall, the first step is to install the batteries. This is done using two (for more than 10 sections - three) brackets, which are pre-hammered into the wall. The inlet and outlet water pipes are protected with special plugs. It is important to accurately align each radiator both horizontally and relative to the wall. This will not only give the entire system an attractive design, but will also increase the service life of the heating circuit.
The brackets must be able to withstand heavy loads. They are buried into the wall by at least 10 cm. The backlash and vibration of the brackets should be minimal (a few millimeters 20 cm from the wall).
Step 2: Well, and the pipes only later
Some new homes have special holes in the floor slabs for piping systems. If these holes are not available, they are punched with a puncher, with a double reserve in diameter. For example, for two pipes with a diameter of 20 mm, a common hole of at least 50 mm is punched. Pipe cutting is done with a grinder, or for a small amount of work - with a hacksaw.
The placement of pipeline diagrams strictly vertically is a condition for their long and problem-free service. First, the entire riser is welded with an iron, then it is secured to the wall with special clamps. We use a level and a hammer drill (as with the heating radiators themselves). Next, taps are made to the batteries themselves.

Most often, you have to deal with replacing heating radiators during major repairs. They are usually replaced after windows and window sills are installed.
Radiators create warmth and a comfortable stay in the house, which means their installation must be competent and durable.
It is very important to understand how to install a heating radiator correctly.
There are several ways to attach radiators. Most often they are mounted under windows, and sometimes on walls and in the hallway at the entrance. To install batteries, brackets or racks are used that are fixed to the wall surface.
Pipes are connected to the battery from two (or one) sides and from below. If pipes are provided on one side, then you need to clearly calculate the number of sections, since half of the radiator may remain cold. Experts recommend not installing more than 12 sections if water circulation occurs naturally. With artificially created circulation, the number of sections can be increased to 24.
How to install a radiator?

If you want to install a large number of sections, then you need to worry about how to connect the pipes to the heating devices.
When calculating the number of sections and installing a radiator, you need to take into account the throughput of the pipes. It is determined by the internal diameter of the product and the roughness coefficient.
In order to correctly install a heating system that will provide maximum thermal output, you need to adhere to several rules when making calculations:
- to make it convenient to clean under the battery, the distance from the floor to the bottom of the battery should be about 10 cm;
- there should be a gap of up to 5 cm between the wall and the radiator. If the distance is smaller, heating will begin not of the room, but of the wall;
- there should be 10 cm from the radiator to the window sill.

In order to be able to adjust the thermal output of the heating battery automatically or manually, it is necessary to take care in advance of installing thermostatic valves. If a leak or other emergency occurs, you can autonomously turn off the heating system. Automatic control of the heating system is possible thanks to the installation of thermostatic valves directly on the valve.
If the installation of valves is intended for a heating system with one pipe, then care must be taken in advance to ensure that the two pipes have jumpers between them. If they are not present, installation of thermal heads is not permissible.
In addition to the listed elements, the heating radiator must be equipped with a Mayevsky tap. The valve is used to remove air from the radiators and from the entire heating system. This procedure is carried out at the beginning of the heating season and then periodically during the operation of devices for heating the room.
Stages of installing a heating battery
- Markings for future brackets must be applied to the surface of the wall, and then secured.
- Place the Mayevsky tap on the heating radiator along with the control valves (if necessary) and the plug.
- Using a level, you need to secure the radiator to the brackets.
- Connect radiators to heating system pipes.

To ensure uninterrupted, well-coordinated operation of the battery, you need to make the first start. If you don't have the necessary plumbing skills... In order to install radiators correctly, it is better to use the help of specialists. If the heating system is installed incorrectly, a pipe rupture may occur with all the unpleasant consequences.
To ensure the smooth functioning of thermal valves and increase thermal output, it is better not to install various decorative grilles on the radiator. It is also better to place furniture away from heating radiators.
When choosing radiators, you need to remember the maximum temperature of the coolant in the centralized heating system. Usually it is 65-105 degrees. In apartment buildings, the pressure level is usually 10 atm.
How are bimetallic radiators installed?

Since the heating system experiences hydraulic shocks at the beginning of the heating period, when choosing batteries, it is worth giving preference to bimetallic batteries or those in which the operating pressure is more than 16 atm.
Panel steel batteries are best installed in private homes. You should be aware that the declared power of radiators may be significantly higher than it actually is.
Currently, bimetallic radiators are considered one of the most efficient batteries. They have increased heat transfer. Their modern design will suit almost any interior.
The following tools and materials are required to install batteries:
- water containers;
- torque wrenches;
- perforator;
- building level;
- pencil;
- roulette.
Stages of installing bimetallic batteries

Norms and rules for installing a heating device: distances from the floor, walls, window sill.
First of all, you need to find out the diameter of the supply pipes. You should then order a mounting kit of the appropriate size. The bimetallic radiator package includes:
- air release valve;
- adapter for Mayevsky valve;
- two adapters;
- stub;
- brackets;
- gaskets for the plug and adapter.
You should prepare containers in advance, turn off the water and drain the remaining water from the heating system. After this, the old radiator is dismantled by unscrewing the threaded connections of the outlet and inlet pipes.
The installation locations of the brackets are marked. When working, it is recommended to attach radiators to the pipe connections. Using a building level, horizontality is checked. Fasteners are applied to the installation site and mounting holes are marked with a pencil.
In the designated places, holes of the required diameter are drilled using a hammer drill. If the number of sections is no more than 8, then three brackets will be enough. If there are from 8 to 12 sections, then 4 fasteners must be installed.
The radiator is installed on the prepared brackets so that all horizontal collectors are on hooks. One of the features of installing such radiators is that the entire kit must be in the package until it is installed.
A Mayevsky valve, which is included in the delivery package, should be installed on each radiator. Use a torque wrench to tighten the valve. After this, thermostatic and shut-off valves are installed.
Next, the bimetallic radiator is connected to the heat pipes of the heating system. It is not recommended to clean the surfaces to be joined with a file or sandpaper: this will lead to leaks.
The technology for installing heating batteries is quite simple. Having studied the sequence of work and prepared the necessary tools and materials, the installation can be completed independently.


 horoscope by year of birth")