Used engine oil is an excellent fuel, you just need to create it optimal conditions for its combustion.
It burns best in a heated or atomized state, which is implemented in some burners, including homemade ones. DIY waste oil burner based on those presented in this review drawings, will delight you with a powerful torch of flame and big amount heat.
Let's see how to build such a burner and what to choose for a prototype.
What is a Babington burner?
A homemade oil burner can be used in the most for different purposes, for example, to work with universal boiler or as part of a simple liquid fuel stove. The main task is to assemble a nozzle that will produce a powerful flame. Here are the requirements:
- Low power consumption;
- Ease of manufacture;
- High efficiency;
- Impeccable operation of the homemade product even on contaminated fuel.
We have already said that in order to effectively burn used oil, you need to heat it or spray it. The easiest way is to heat it up to a high temperature using a heating element, but this is fraught with high energy costs. A liquid burner should become a source of cheap heat, but in the case of electric heating (evaporation) this is impossible - tariffs for public utilities in our country are very large.
Since we cannot provide heating of the used oil with its subsequent evaporation, therefore, we need to try to spray it. This is exactly what the Babington burner, which has an extremely simple design, allows you to do. If we take a simplified drawing, we will see that the fuel flows here along a spherical surface in which a thin hole is made - air coming out of the compressor is supplied through it. The air jet blows away particles of used oil from the surface of the sphere, resulting in the formation of a fuel-air mixture.
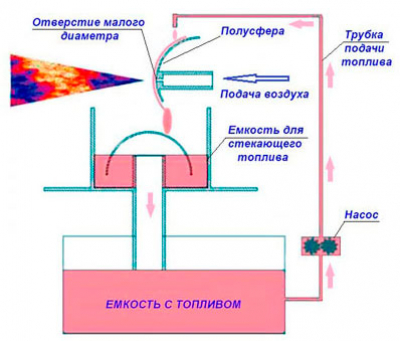
The above diagram provides, albeit somewhat simplified, but still a fairly intelligible explanation of the principle of operation of the burner.
The resulting mixture is ignited, and the burner flame is used for one purpose or another. For example, nothing prevents you from installing the burner in a universal boiler that can work with any type of fuel. It's also possible self-production boilers, there is nothing complicated about it. An interesting fact is that there is virtually no evaporation here - the process takes place at almost a low temperature, due to the pressure of air from a very thin hole.
For more efficient combustion in the burner liquid fuel a waste oil heating system is activated using a low-power heating element. Here approximate diagram for the manufacture of such a burner.
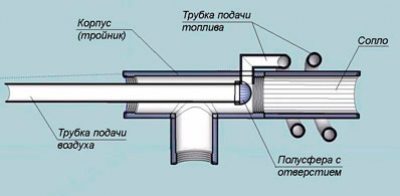
The Babington burner is a fairly simple device, but its manufacture will still require some skills that are unlikely to be obtained anywhere except through experience.
The Babington burner has many advantages. First of all, she doesn't need pre-cleaning waste oil, and there are a lot of impurities in it - it’s not for nothing that it has such a black color. Secondly, it is extremely easy to manufacture. If you love and know how to work with tools, you can easily cope with its assembly and have a simple and effective source of heat at your disposal.
The evaporative burner during exhaust requires another heat source. This leads to the need to use large quantity electricity or to the complexity of the design - you need to somehow heat the fuel so that it begins to disintegrate into flammable fractions. Babington's scheme is much simpler - it is difficult to do without a compressor, but it can do without evaporation. It involves the simplest spraying of fuel, after which it ignites without much difficulty.
Equipment refurbishment
Making a waste oil burner from scratch is much easier than making any modifications that require investment. For example, user reviews indicate that converting a diesel burner for testing costs fantastic amounts. The design turns out to be complex, requiring fuel heating. It’s easier to order a ready-made nozzle from China or buy a product Russian production, or even better, make the burner yourself.
Burner in production blowtorch- also not the best the best option. Just remember how a blowtorch works. Gasoline is poured into it, which is supplied to the nozzle under air displacement pressure. The nozzle itself is preheated, since the fuel must burn in an evaporated state. Since gasoline is a highly purified fuel, it easily passes through the nozzle without clogging it with impurities.
Using a burner during mining is associated with a constant risk of fire, so having a fire extinguisher in the boiler room is strictly necessary!
In the case of used oil, everything is much more complicated - it contains the smallest particles of metal, gasoline combustion products, gasoline itself, various fractions of decomposed oil and many other contaminants. The nozzle in the blowtorch will become dirty very, very quickly. There are some ways to modernize the injector, but they are not justified. Therefore, next we will look at how to make a Babington burner with your own hands and save yourself from difficulties and high costs.
DIY assembly
A homemade burner for a heating boiler is a great chance to save money in your budget. Costs compared to store options, will be extremely small. And if you're lucky, you can do it absolutely free. The most expensive part in our scheme is the compressor from the refrigerator, which provides air pressure of up to 2-4 atmospheres. Let's see what materials we need:
- Fuel tank with built-in heating element - don’t be alarmed, a heating element will not work continuously, but only to partially heat the fuel;
- Another tank to collect fuel that did not go to the injector;
- Thin copper tube for air supply (suitable from the same compressor);
- Pipe for draining used oil;
- Oil pump for pumping drained excess into the main fuel tank;
- Two-inch pipe for making a nozzle;
- Tee for a two-inch pipe;
- Material for making a spherical nozzle (you'll have to use your imagination here).
Preparing the injector
First, we need to prepare a spherical nozzle through which the used oil will flow. It is necessary to make a hole in it with a diameter of 0.2-0.3 mm. The larger the hole diameter, the greater the burner power. And here a small difficulty awaits us due to the fact that the air channel must be very smooth - the air must hit forward, into the nozzle tube, and not into its walls. It would be ideal to drill the hole not by hand, but on a machine, using a drill of a suitable diameter.
If you are lucky enough to find a ready-made jet with a suitable diameter, then it will be perfect option– it must be mounted in the center of the hemisphere.
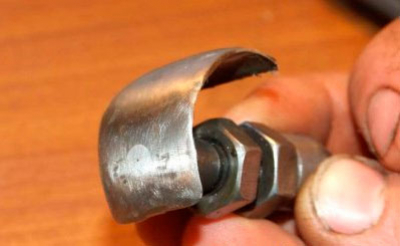
If you don't find a hemisphere, use a rounded piece sheet metal, to which a jet is welded from the inside, as shown in the picture.
The result of our work will be the most important part of our waste oil burner - this is the spray nozzle. Heated fuel will flow through it, atomized by the incoming air. From here, the fuel-air mixture will enter the burner pipe, and a flame will rage at the outlet. By installing the burner in a universal boiler, we get an inexpensive heat source.
Assembling the main part of the burner
We continue to make a waste oil burner with our own hands. We have the main part ready, all that remains is to put it in the body. The body will be a tee with a pipe 200-400 mm long screwed to it. We weld or screw the nozzle to the air supply tube that will go to the air compressor. We insert the sprayer inside the tee and secure it with fittings. We make a hole in the tee into which the fuel supply tube is inserted - it should end directly above the nozzle.
The lower part of the tee will act as a discharge tube. Screw in an adapter for a thinner pipe here, connect a pipe to drain excess fuel into the drain tank. For fuel supply and removal, we recommend using thin and flexible copper tubes. The burner itself is ready, all that remains is to deal with it external parts– these are tanks and an oil pump.
Final stage
Homemade waste oil burners delight consumers with a powerful flame. But in order to ensure their uninterrupted operation, it is necessary to carefully consider the design external nodes. In our burner, waste oil flows down a spherical sprayer, but is not completely directed into the nozzle - most of goes to the stock tank. From here it flows into the main tank, where there is a low-power heating element. If you do not want to transfer fuel manually, use any suitable oil pump.
The pump itself is placed between two tanks - it sucks waste oil from the drain tank and directs it to the main tank. As a result, we get a fuel cycle. Users will only have to periodically add it, since some of it gradually burns out at the outlet of the nozzle.
In order for the assembled unit to last as long as possible, all connections must be lubricated with high-temperature sealant.
As for the heating element, it must be equipped with a thermostat. It is needed for primary fuel preparation. Used oil is quite viscous, and for the injector to work it must be thinner. Therefore it needs to be warmed up. But not to a temperature of +250-300 degrees, as is done in evaporative burners, but only to +70 degrees. In this state, it will be liquid enough to fall off in the form of tiny droplets from the surface of the spherical atomizer.
In total, we have three energy-consuming nodes:
- Air compressor – used to create a fuel-air mixture;
- Heating element - transforms used oil into a more liquid state;
- Oil pump – drives unused waste oil from one tank to another.
We will not be able to make the burner non-volatile, since we cannot get rid of the compressor or heating element.
Starting the system
The crucial moment has arrived - testing a burner operating on waste oil. We fill the system with oil, turn on the heating element and the oil pump, wait until the fuel warms up to required temperature. After this, turn on the compressor and carefully light the burner - a powerful flame will appear, the intensity of which is regulated by changing the pressure. Now you can connect the burner to the boiler and wait for the heating system to warm up.
You may object - they say, what is the point of this burner if it consumes electricity. We assure you that it is impossible to do without electricity. Even store-bought pressurized liquid burners require connection to an electrical outlet, otherwise it will be extremely difficult to achieve a powerful flame.
Video
A do-it-yourself burner may be necessary when cold weather sets in. You can, of course, use other types of equipment of this kind to heat your home, but one of the most inexpensive and easiest to manufacture is a waste oil burner. With its help you can heat up quite easily country house or utility room. As an advantage, we can highlight not only the low cost of production, but also the availability of fuel, which is consumed very economically. If you work in transport company, or you have the opportunity to get oil, then you will be able to not only use the fuel for free, but also dispose of it without problems.
Features of burner manufacturing
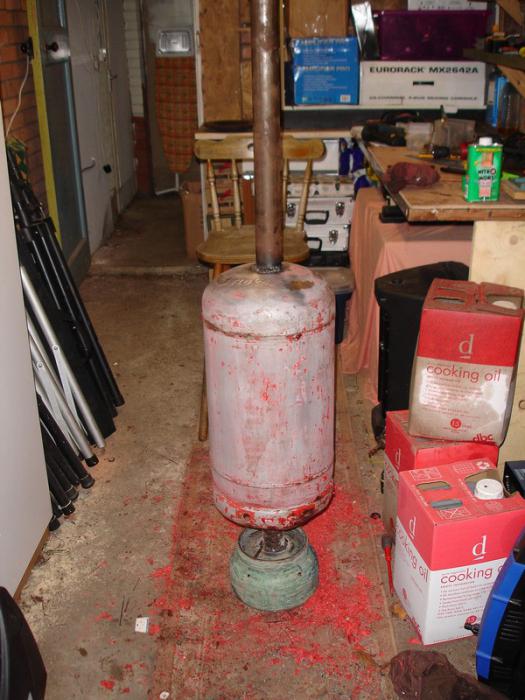
Made with your own hands, it should have a small size, and outwardly it will resemble gas cylinder. Pipe sections made of metal are fixed to the body at the top and bottom. They must be strengthened by welding, and positioned opposite to each other. The lower section is needed in order to supply the oil-oxygen suspension to the compartment where combustion takes place. The upper section is used as a burner flare. A torch of flame with a significant temperature erupts from it. In order to provide air flow into the structure to form a flame, it is used household vacuum cleaner, you need to use one that has significant power.
Preparation before starting work
A do-it-yourself torch cannot be made without using a certain set of tools, including a welding machine that will allow you to correctly connect the elements. You will also need a grinder, as well as a lathe.
The manufacturing process should begin with the body, for which you will have to find an empty gas cylinder whose dimensions are suitable.
Balloon manipulation
If you are thinking about how to make a Babington waste oil burner with your own hands, you must first get rid of the filler hole of the cylinder. Next, using a pre-prepared template, you need to make the markings that will be needed for the correct installation of pipes. Then it comes into play if you have one in your toolbox. With its help, you will prepare the holes, placing them along the inside of the contour. During this process it will be necessary to use a spiral drill. You have to get rid of the jumpers that have formed between the holes; you need to use a chisel or grinder, but you need to act very carefully.
A do-it-yourself burner must be made taking into account the formation of the correct holes for installing pipes; for this, you should use a round file, which will allow you to bore the circles; you must do this manually, which will complicate the process and make it longer. If you wish, instead of this tool you can use a cutter, which is previously placed in an electric drill. We should not forget that when working with metal, the master must follow safety rules.
Work on pipe installation
Pipes that are secured by welding should be installed in holes of the required diameter. The pipes need to be marked in advance, and then cut off the required part from them using a grinder. It is worth making a hole in the lower part of this element, and then welding an M16 nut. This hole is useful for mounting an oil nozzle.
Making an injector
A do-it-yourself waste oil burner, the manufacturing instructions for which are presented in the article, can be made using lathe, which will be useful during the oil injector stage. As a base, it is worth using a rod that has a smooth shank. It will be necessary when fixing the fuel supply hose. If it is in the burner, then you need to prepare the thread on this part. A significant part of the length of the rod should be cut metric thread. The pipe must have a diameter of 16 mm. You need to drill a hole almost the entire length of the nozzle. It may have a transverse part that is located at the bottom, while its diameter is 3 mm. If the master can work on a lathe, then this part can easily be made independently. But if you do not have such equipment, then you can order the production of the part from a specialist.
The principle of operation of the described part of the burner is based on the drainage of oil, which has a viscous consistency, from a hole made in the transverse part. After working out, it is captured by the oxygen flow. In this case, the fuel is broken into droplets. This makes it easier for a fire to occur.
Making a burner during development
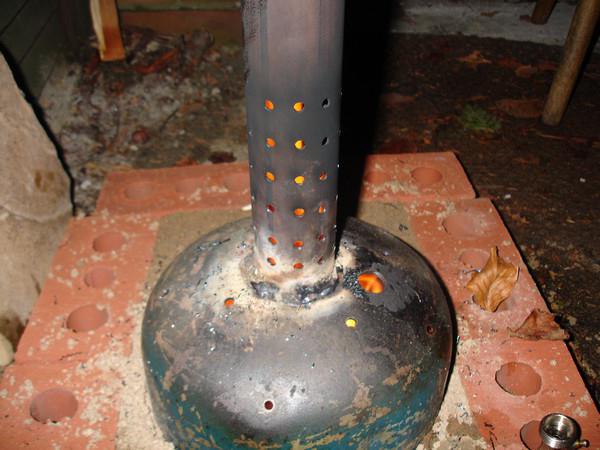
A do-it-yourself burner, the working model of which is presented in the article, will work as efficiently as the oxygen flow is intense. The system for adjusting this parameter is based on a cup made of metal. It has a semicircular bottom, among other things, it has a hole that has a given diameter. This fairly simple part can also be made on a lathe. You can make the bottom in the form of a hemisphere using cutters, and the work should be done by a professional turner. It is necessary to adjust the air flow with a curtain, which has a round shape. Its fastening should be done on an L-shaped axis, using an M4 screw for this, only in this way will it be possible to obtain a strong connection that a self-made burner will have; the waste oil in it can become dangerous. But you can avoid problems that can lead to a fire if you follow the rules fire safety.
In order to ensure a reliable connection of the outlet pipe to which the hose is attached, an adapter should be used. The latter must have a slot along its entire length. The adapter, among other things, will ensure normal operation of the air valve.
Making the burner cover
![]()
During ignition, access to the waste compartment is provided by an element in the form of a lid. This part must have quite a significant weight. It is mounted on pre-welded canopies, which must be mounted on the neck of the structure body. If the element is made with less impressive weight, then there will be a possibility of spontaneous opening of the device during operation of the burner. You can check the correct operation of the burner by assessing the flame, which should be even and have purple tint, it will appear during the combustion of the oil-oxygen mixture in the body of the structure.
Fire safety rules
A homemade waste oil burner should not only be effective, but also safe. In order to ensure compliance with safety regulations, it is necessary to protect the place where the nozzle and hose are fixed, the latter of which carries oil in liquid form. Protection must be done through the use of a metal shield. It is necessary in order to prevent the work from catching fire if a leak occurs.
Finally
Doing it yourself is quite simple, although at some stages there is a need to use a lathe. If you have one in stock, you must follow safety regulations. The same applies to plumbing work. Among other things, it may be necessary to use other power tools during work, which require compliance with fire safety requirements. The master must use personal protective equipment.
When making a Babington burner with your own hands, you must be careful when choosing the cylinder that will form the basis of the burner body. It is imperative to free it from residual gas, otherwise an unforeseen situation may arise, fraught with life-threatening injuries.
Disposal of used motor oil (waste oil) is sufficient serious problem worldwide. At the same time, the energy potential of mining is high; By burning it, you can get a lot of heat, incomparably cheaper than from any other energy source. The question of how to make a burner for testing with your own hands is of interest not only to those professionally involved in the automotive industry - a stock of mining will help save a significant amount on heating utility rooms in a private household. The waste is completely unsuitable for heating residential premises due to the original additives contained in it. engine oil and impurities that got into it during operation. However, waste is a very specific fuel, and any other liquid fuel burner will not work with it. This article discusses what types of burners “eat” waste and what needs to be taken into account when making them.

Fuel Features
Spray fuel is not only dirty, but also very sticky. One of the tasks of engine oil additives is to ensure that a thin layer adheres to friction surfaces operating under difficult conditions. Therefore, burners during processing work almost exclusively with heating of the fuel, which increases its fluidity: too viscous fuel will not mix properly with air, will not pass through the nozzle nozzle, or will not coat the spray head in an even layer (see below).
Setting fire to the waste is also not so easy: what kind of engine oil would it be burning in a very hot engine? In fact, for quick and reliable ignition, workings are only suitable electric spark and a gas torch. There is, however, one exception, see below.
And thirdly, the waste is contaminated not only with solid particles, but also with water and/or antifreeze that got into it from the internal combustion engine cooling system. Fuel filtration – enough difficult process. It makes sense to organize it only if fuel burner is constantly available, for example, in a fairly large and busy auto repair shop, and the burner used for burnout for irregular use should be insensitive not only to solid contaminants, but also to water content in the fuel.
Electricity for burner
This leads to an unfavorable conclusion: there are no energy-independent burners during mining. There are ways to burn waste without pressurization and heating, but such devices (see below) give acceptable technical and environmental indicators only as part of heat-generating devices developed at the same time and are not burners as such. Therefore, if your power supply is unreliable and there is enough waste, it would be better to use a boiler.
Which one should I do?
Based on the listed features, homemade burner on used oil, one of the following can be performed. systems:
- Ejection with supercharging.
- Spray injection (Babington burner).
- Fuel-air free volumetric combustion (cup evaporative burner).
Comparative advantages and disadvantages
Ejection
The ejection burner ensures complete combustion of fuel and the minimum possible amount of by-products in the exhaust gases. The flame is hot, over 1200 degrees, fuel consumption is minimal for this class of devices (see also at the end). The power of homemade ones is 1.5-100 kW. Burner power adjustment (modulation) is possible within the entire specified range. It can be used without restrictions for technological purposes, and in exceptional cases it can be used for temporary heating of residential premises, if combustion door regular heating stove or the boiler goes into a non-residential area - into the hallway, closet, furnace room, etc.
Note: the kitchen and bathhouse are considered living quarters.
The disadvantages of an ejection burner during mining are also significant:
- Technically complex: precise metal parts are used that require machine tools for production;
- In untreated mining, it immediately fails, so it is pointless to make an ejection burner at mining without acquiring a fuel filter station;
- The most energy-dependent - its own specific power consumption is approx. 20 W per 1 kW of thermal power in the range of the latter 5-40 kW. Below and above these values, the own specific power consumption increases.
- Requires the supply of control automation, because it is very sensitive to the properties and quality of the fuel, which are also unstable in purified waste;
- More than other types of burners during testing, they are prone to avoidable operational failures.
Ejection burners are used to burn waste mainly for heating large premises or ensuring technological processes in conditions where fuel for them is constantly available.
Injection
An injection burner is completely insensitive to the degree of contamination of the fuel, as long as 30-40% of something combustible remains in it. Technically simpler than the previous one, a Babington burner can be made at home from scrap materials (see below) if you have a tabletop drilling machine. Power range in amateur version – approx. 3-20 kW. Burner modulation is possible from approx. from 30% of maximum power. It is possible to achieve modulation from 10% maximum, but the technical complexity of manufacturing increases significantly, and the tendency to failure increases. Can operate without electrical fuel heating; in this case, its own energy consumption is up to 300 W, regardless of the thermal power; in the vast majority of cases - up to 100 W. If the fuel is heated by a heating element in storage tank, then the own energy consumption is the same as before. case. Without automatic control, it is prone to failures when changing a batch of fuel without reconfiguring the burner.
For do-it-yourselfers, an important advantage of the Babington burner is that its pressurization can provide compresses from an old broken refrigerator, see below. However, the Babington burner has plenty of disadvantages:
- Fuel does not burn completely. Fuel efficiency simplest burner Babington (see below) ca. 80% It is possible to bring the degree of fuel combustion to 95-97%, but then its technical complexity increases to that of ejection. True, turning and milling machines are still not required for manufacturing, and the burner’s own energy consumption does not increase;
- As a consequence of the previous p., the Babington burner emits a lot of fuel vapor into the air, which makes it absolutely unsuitable for residential premises and limitedly suitable for premises with people and/or objects sensitive to oiling temporarily staying there. However, it is possible to drive the flame of a Babington burner into a pipe (see below), which significantly reduces these disadvantages;
- The flame is also dirty and not very hot, up to 900-1000 degrees. Therefore, an injection burner during processing is of limited applicability for thermal technological processes with ferrous metals, but it will ruin non-ferrous and especially precious metals.
Homemade Babington burners are most often used for temporary heating of utility rooms or in simple technological processes, for example, for heating up regular structural steel under bending.
Evaporative
A fuel-air burner for processing can be made from scrap materials without the use of complex technological operations. Power – approx. 5-15 kW. Fuel without reconfiguration consumes any heavy fuel: in addition to mining, other mineral and vegetable oil, fuel oil, oil sludge. It only fails if used incorrectly. It emits more by-products of fuel combustion than the previous one, therefore it is applicable either for temporary starting heating devices With good chimney V non-residential premises, on either outdoors. For technological purposes, its applicability is very limited, because produces a column of hot gases with a temperature of less than 600 degrees. The type of burner that is most accessible for manufacturing by beginning craftsmen is to be tested.
Schemes and designs
Ejection
Another feature of mining as a fuel is that it is very difficult to supply all the air necessary for its combustion under pressurization; a lot of it is required. Therefore, by pressurizing in burners of this type, fuel is mainly drawn out from the ejector nozzle and atomized, and air for afterburning is sucked directly into the flame. This scheme makes it possible to use electric power of up to 100 W for supercharging, and the rest is spent on heating the fuel with a heating element. In general, the idea is this: we use part of the electrical power (with a significant increase, by the way) necessary for pressurization with more fluid fuel to heat the waste, and a generally conventional ejection burner works on it.

A well-known diagram of the design of an ejection burner during testing and drawings of its heart - the nozzle for approx. 3-30 kW are given in Fig. Such a burner is installed on a blind flange in the combustion opening of the furnace/boiler, and secondary air is sucked into the torch through the ash pan. However, in addition to the nozzle, there are still subtle points in this design.
Turbulizer
The first of them is an air flow turbulator (swirler in the diagram in the figure above). Pressurization of the ejector burner during processing can be provided by a built-in volute fan or, through a gearbox, by the pneumatic system of the enterprise or by an industrial (possibly domestic of a similar design) piston compressor. For a burner power of about 3-15 kW, boost from a refrigeration compressor of 250 W electric is also possible.
Depending on the method of pressurization, the design of the turbulator changes. Compressor or wiring compressed air to drive a pneumatic tool, under the conditions necessary for fuel ejection in the burner air jacket, they provide too powerful and fast an air flow. The same is possible with a snail that is too powerful, for example taken from old trash. In this case, the turbulator should be an annular diaphragm around the nozzle with wide, slightly curved outer blades, pos. 1 and 2 in Fig. A pseudo-laminar jet of air from the diaphragm will pull the fuel out of the nozzle and ensure its stable ignition (see below), and 3-5 cm from the diaphragm, the burning oil mist will be picked up by a powerful whirlwind, atomized until it evaporates and is completely burned.

If the air flow is optimal (built-in volute by calculation) or weak (compressor from a refrigerator), then a turbulator made of many narrow, more curved internal blades is combined with the diaphragm, and an annular gap of 0.5-1.5 cm is left along the edge of the turbulator. Diaphragm - the swirler has less resistance air flow, a weak, but immediately well-twisted vortex effectively sucks out and sprays the fuel, and the annular flow from the gap prevents the vortex from spreading to the sides until the fuel evaporates in the torch.
Note: the appropriateness of one or another turbulator for a particular burner is determined by experience - fuel ignition should be stable, and there should be no flameouts throughout the entire burner power adjustment range. You need to start with the diaphragm with the outer blades, bending them more and more. If it doesn’t work out, you need to switch to a turbulator diaphragm with internal blades.
Ignition
The second subtlety is igniting the torch. An autocandle with a removed “foot” (body lamella) is not very suitable, because designed to ignite light fuel vapor with a short spark, and not heavy fog with a long spark.

The burner torch must be ignited during production using electrodes for igniting liquid fuel boilers, see fig. The distance between the dischargers (spouts, tips) of the electrodes is required 3-8 mm (for burners 3-30 kW), and the distance from the bare metal parts of the electrodes to the nearest metal parts the structure should be at least three times larger. Turning on the nozzle: at the moment of ignition, the spark gaps must be in the oil mist emitted by the nozzle and ignite it with a spark among themselves. Ignition with a spark from a spark gap to the injector will produce a weak, unstable torch, which can easily be disrupted by fluctuations in boost or fuel supply.
For ignition with two spark gaps, a special ignition transformer with an isolated secondary winding at 6-8 kV. Its terminals are connected to the ignition electrodes with wires in thick, from 2 mm, heat-resistant insulation made of silicone or Teflon (fluoroplastic). The latter is better: when heated to 150 degrees, the penetration resistance of fluoroplastic-4 remains approx. 80 kV per 1 mm, and silicone will not exceed 20 kV/mm. Such a huge margin of electrical strength is necessary due to severe contamination of the wires during operation.
A special ignition transformer is expensive, because These are produced for boilers from 20 kW. If the burner power is up to 15 kW (and for the Babington burner described below), you can use a single-wire ignition circuit from a car ignition coil with a spark from the electrode to the nozzle; meaning there is only one high voltage wire. Condition – manual switching to the mode: the burner is lit at minimum power and manually bring it to normal, making sure that the torch does not get stuck in convulsions and does not break.
To ignite the burner during testing using a single-wire circuit, the body terminal of the transformer is connected to the burner body and the nozzle with different return wires. Spark is not D.C., and a pulsed discharge, and the electrical circuit becomes sensitive to the presence of reactivity in it. The electrical reactivity of the massive burner body is greater than that of the nozzle, which already makes it easier for the spark to choose the nozzle. If you additionally include a small inductance in the body return wire (see figure), then single-wire ignition will become quite stable.

About automation
Burners for testing, the operating mode of which is set from a remote control (for example, the well-known NORTEC) are very expensive, but without automation there is no point in installing a homemade ejection burner for testing: even with a fixed power and filling with fuel from the same batch, it is necessary to regulate simultaneously to obtain a stable flame fuel heating and air supply. Therefore, homemade ejection burners during testing (excluding samples, just to tinker with them) are made semi-automatic with manual power setting and the use of relatively inexpensive automation from heating boilers, see for example. video
Video: burner in operation with automation
Babington burner
Robert Babington himself, who patented his burner in 1979, admitted that, having despaired of coming up with a nozzle that would not become clogged from working out, he remembered one of Murphy’s laws, which states: “If the iron still doesn’t want to work, try making it it's the other way around." Babington tried to blow air through thin layer butter - it worked. The fog began to set in, but how to burn it is a known matter.
This technical solution was possible due to the fact that oil is a rheological liquid. Simply - superfluid. It is not only exotic helium II that is superfluid. There are plenty of rheological fluids all around us. Who forgot on the table open jar With sunflower oil, will understand immediately.
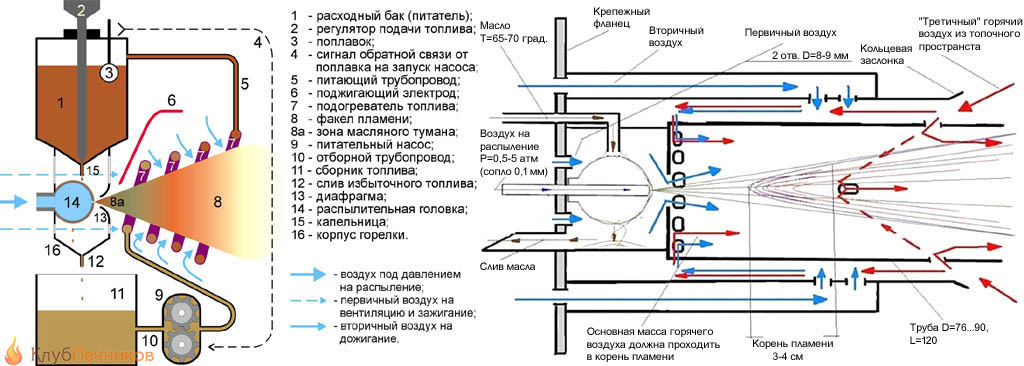
The design of the Babington burner is shown on the left in the figure, and on the right is the design of the combustion chamber (afterburner) for it. The disadvantage of this burner is already visible here: to burn the waste by more than 95%, a 3-stage air supply is required (except for atomization), and partially heated. Although boost is still not required.
The Babington burner operates quite simply: fuel drips onto a spray head with a spherical surface, which ensures its uniform spreading. It drips in excess so that the air always has something to blow off. The oil thrown out by a jet of air from the nozzle in the head forms a mist, which is set on fire. The fuel film constantly creeps onto the nozzle due to the rheological properties of the oil. Excess fuel flows into the collection tank, from where the feed pump supplies it through the heater back to the supply tank (feeder). Often, instead of a float turning on the pump, the feeder is provided with the excess in the tank draining directly into the collection tank; In this case, the feed pump operates continuously. However, the Babington burner also has enough design nuances.
Is a full sphere necessary?
The power removed from one Babington burner nozzle is limited by the finite value of oil fluidity. Therefore, the heads of powerful Babington burners are literally riddled with pores. If no more than 5-7 kW is required from the burner, it is possible to use part of the spherical surface instead of a technologically complex full-spherical head.

The design of a Babington burner with a partially spherical spray head is shown in Fig. (how to do this is described in detail and with photos here: diyworkplace.ru/14-diy-oil-burner.html). In addition to the availability of materials, it is good to learn how to adjust the fuel supply with this burner: a little more, the oil flows behind the blade of the head, stinks, burns, and clogs the spray chamber.
The sphere is still better
The spherical head in the Babington burner is also better because it saves fuel: in a burner with a partially spherical head, a good portion of the return burns until it is impossible to use. In the end, it turns out that there is still a quarter or more in the tank, but the burner does not start.
How to make a Babington burner spray head from inexpensive materials for a completely different purpose, available in wide sale, shown in the figure:

The good thing about a curtain rod plug is that its cut surface is flat and even. Drilling a nozzle hole in such a head blank is not difficult using a conventional drilling machine. If it moves away from the pole of the sphere within 1-2 mm, it’s okay. The main thing is that the axes of the nozzle and the sphere will be parallel and the torch will shoot evenly. You can even increase the power of the burner by drilling 3-4 holes around the pole of the sphere no closer than 6 mm from each other in a triangle or square. All that remains is to decide - how to drill?
How to make a 0.25 hole with a 0.6 drill
The permissible limits for the diameter of the Babington burner nozzle are 0.1-0.5 mm. A smaller one is removed from the narrow nozzle maximum power, but the range of its adjustment expands, which is carried out by changing the air pressure for spraying. The latter for a 0.1 mm nozzle can vary within 0.5-5 atm, for a 0.25 mm nozzle - 1-3 atm, and the pressure in front of a 0.5 mm nozzle must be kept within 2 (+/-)0, 2 atm, otherwise the flame either breaks or goes out. Babington recognized the nozzle diameter of 0.25 mm as optimal; narrower nozzles become clogged with dust from the air, which requires at least 2-stage cleaning.
But how to drill a hole with a diameter of 0.25 mm? You can’t buy drills like this everywhere, and the machine needs high precision, otherwise the drill will immediately break.
The way out is to make a nozzle from part of a needle from a medical syringe. The channel diameters of syringe needles are 0.2-1 cubic meters. see are just within optimal limits, and their outside diameter 0.4-0.6 mm. These drills are widely available, and they can be inserted into a regular tabletop drill. Making a Babington burner nozzle from a medical needle is done as follows. way:
- Cut a piece from the needle 2-3 mm longer than the thickness of the head wall.
- We use a thin, stiff wire to remove sawdust and burrs.
- Using a drill slightly larger than the outer diameter of the needle, we drill a pioneer channel in the head. If you use a 0.6 drill to drill a channel for a 0.4 needle from the outside, it’s okay.
- Using a drill with a diameter 0.15-0.2 mm larger than the pioneer one, we countersink the hole on both sides. The chamfer needs to be removed tiny, so we countersink by hand, wrapping the drill shank with electrical tape and turning it with your fingers.
- Insert a piece of needle into the pioneer hole.
- Using two sharp awls or, better yet, metalworker's scribers, we unfold the ends of the needle segment. You need to unfold it at the same time, pressing lightly and turning the tools in opposite directions.
- We leave the bell inside as is, it does not interfere with anything.
- We remove the external excess using an emery stone no rougher than No. 360.
- Once again we clean the nozzle channel, blow it out - the head is ready.
What if the head is already ready?
Very much possible variant. If you take a ready-made diesel fuel nozzle onto the head; A defective one made from junk or cheap will do. Fans are confused by the fact that they are produced with a power of 20 kW, but in this case there is nothing to be afraid of, because It is not diesel fuel that will flow into the nozzle, but air. But her working surface exactly hemispherical, mirror-smooth, with a collar that prevents the oil from flowing where it shouldn’t and burning. The nozzle, however, will be from 0.7 mm, but it can be narrowed as described above. How to make a Babington burner head from a diesel injector, suitable for long-term intensive use, and even with automation from a hot water boiler, see story
Video: Babington burner with automation
Compressor for atomization
Atomizing air in a Babington burner requires a little air, but under decent pressure. A compressor from an old refrigerator is best suited for this purpose, but you need to put a car air filter in front of it, otherwise Vacuum pump will quickly fail. You also need a receiver, because... Such a compressor will produce a strongly pulsating jet.
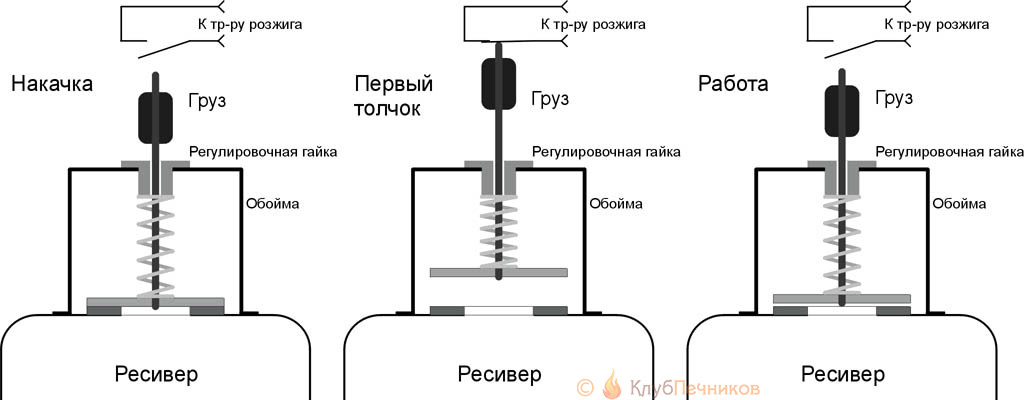
How to adapt a compressor from a refrigerator to supply air to a Babington burner during mining
The great advantage of such a system is the ability to automate burner ignition without electronics. We use for this safety valve(see figure), because The refrigeration compressor builds up pressure to more than 5 atm. Let's take the worst valve, a disc valve with a flat seat (the disc and seat will need to be ground together with abrasive No. 600 or finer and washed with alcohol). Such valves have a large hysteresis (the ratio of opening and closing pressures), but in this case that’s what we need. We will also increase the hysteresis of the valve by placing a weight on its stem. When the compressor pumps the receiver to the initial response pressure, the valve will “puff” sharply, jump up and close the microswitch that supplies power to the ignition transformer for 1-2 seconds. The oil consumption will go up for combustion, the air flow will increase (it is more difficult to blow through a cold oil film), and the valve will begin to work part-time, not reaching the mic. The adjusting nut is convenient for changing the air pressure to change the burner power.
Compressor lubrication
In a refrigerator, the compressor is lubricated with refrigerant, because It pumps out freon mist from the evaporator rather than pure steam. Suddenly the compressor starts to sputter, which means that there is too much refrigerant and it circulates in the system in a droplet-liquid state. If you force a refrigeration compressor to pump air, it will soon deteriorate without lubrication.
You can lubricate the refrigerator compressor with a spindle or other machine oil for precision mechanics. First you need to make a lubricant dispenser, from a 50-100 ml tank, a needle from a regular syringe for 2-10 cc, a tube from a blood transfusion machine and a pair of clamps from the same. The upper one shuts off the lubricant supply, and the lower one regulates its amount.
The dispenser is configured in free space. It is necessary to ensure that a drop of lubricating oil accumulates on the tip of the needle, pointing straight down, for 2-4 minutes, and hangs for the same amount of time until it comes off. Then the needle is inserted perpendicularly into the compressor supply air duct so that its bevel is in the middle of the lumen and oriented along the flow. If the needle is turned sideways or against the air, the oil will not flow.
The system is ready for use, but you will still need to monitor it during operation. Suddenly, some time after starting the burner, the combustion character changes, which means that a lot of oil goes into the compressor and it drives the excess with air. If at least 10 minutes have passed before this, and the flame remains, just begins to pulsate or smoke, you can correct the matter by slightly turning the needle, no more than 45 degrees. If it doesn’t help or symptoms appear earlier, you need to reconfigure the lubricant dispenser for a longer drop accumulation time.
Flame down the chimney!
You can do an interesting experiment with a burner during testing, the results of which are visible in the trace. rice.:
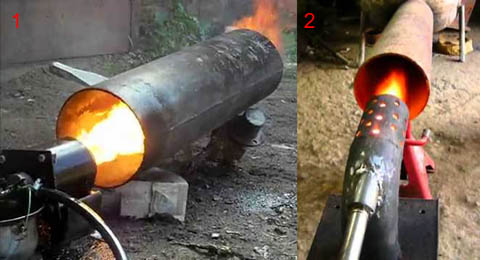
Having passed the burner flame through just 1 m of a wide pipe, we will see it no longer so furious and much cooled down (pos. 1), and a powerful flow of heated air will be noticeable from the pipe up. If you take a pipe with a diameter of 200 mm and a length of 3 m (item 2), then the temperature of the gases at its outlet will drop to less than 100 degrees. Let's expose the mouth of the pipe to the outside - the oil stench in the room will no longer be felt, although the gas analyzer will show excess impurities housing standard. All that remains is to hermetically connect the mouth of the pipe to the chimney, and we will get a heating system with an efficiency of more than 80%.
Evaporative
The waste can be burned without pressurization or heating at all, by dropping it drop by drop into a hot bowl. But such devices, as mentioned above, work more or less decently only as part of a boiler or furnace during mining, so they are not burners in the proper sense and are discussed in other publications.

A fuel-air mixture is supplied to the bowl of the evaporation burner during exhaustion, i.e. a small boost is required (fan from 20 W). The bowl is preheated either with a gas torch (item 1 in the figure), or with regular fuel supplied dropwise (not yet pressurized), ignited by a glow plug (item 2). The latter is easier, but during the first 3-5 minutes there will be a lot of soot. When the flame from the next drop is cleared and begins to rise with noise, the candle is turned off and air is allowed in. Blue tongues will appear in the bowl (positions 3 and 4), indicating complete combustion of the oil, but impurities in it will transform into a chemically more aggressive form and go into the air, so you need to use evaporation burners during processing carefully, see above. The evaporation burner is not critical to the size of the parts; the basis - water pipes 1/2″ and 2”.
Note: for temporary start-up of, for example, a garage potbelly stove, it would be more convenient to use an evaporative burner that operates on the same principle, but into which the fuel-air mixture is supplied tangentially from the side, see the video below:
Video: evaporation burner in production for a furnace
Let's sum it up
So, the burner used for testing is a rather complex device; you can’t make one like this on a table at home. However, when deciding whether or not to have a burner in your hands, take into account one more significant circumstance. Namely, specific consumption minimum fuel for heating: approx. 100 ml per 1 kW of thermal power per hour. The best diesel and oil burners consume from 130 ml*kW/hour, and kerosene and gasoline burners from 160 ml*kW/hour. The cost of heating from those, others and others cannot be compared, because... working out has already worked out its price in the engine.
Burner for furnace in production
During the onset of cold weather, every resident of our country begins to think about how to warm their home. For this purpose, many have now been developed various systems. They all differ in the type of fuel they use, as well as the price of the devices themselves. The simplest and cheapest device for heating a summer house or utility room that you can make with your own hands is a working burner.
Burners can be divided into several types:
- Lighting.
- Welding.
- Heating.
Based on the fuel used, they can be:
- Gas.
- Liquid fuel.
- Combined.
The history of the appearance of burners on used motor oil
This type of burner has been known for a long time and is widely used, since the waste oil used in them is not just cheap, but practically free compared to gas, electricity or solid fuel.
In the distant 60s of the last century, residents of our country began to acquire summer cottages and build houses on them, which in cold weather had to be heated with something. Although gasoline and other types of fuel were inexpensive, salaries citizens also had small amounts, so people were looking for an alternative to gasoline, firewood and coal. And our folk craftsmen have developed with their own hands a system that works in practice.
Its principle of operation was already known. It is similar to kerosene gas, which was used by a lot of people at that time. Kerosene evaporated in it, and then it was burned in a specially designed chamber. This device was relatively safe to use, but had the disadvantage that if it malfunctioned, soot was released and a pungent odor appeared. And this all happened shortly before possible accident. A waste oil burner works on the same principle, only the craftsmen had to think about how to ensure that the combustion of contaminated fuel continues to the very end.
The operation of the device consisted of several stages:
- The initial not too large energy reserve of liquid fuel was allowed to decompose into simpler and lighter fractions. They were the most active. The splitting process is called pyrolysis. This is the thermal decomposition of many inorganic and organic compounds. In a narrow sense, it is the decomposition of organic natural compounds due to a lack of oxygen. In a broad sense - decomposition various connections into several less heavy molecules or elements when exposed to elevated temperature.
- The resulting fractions were burned in several stages.
Advantages and disadvantages of a liquid fuel burner
This equipment has a lot of advantages, the main ones are:
- Easy to make with your own hands and use.
- Wide distribution of drawings for the manufacture of fixtures.
- Cheapness of used oil used as fuel. These devices are perfect for transport organizations and companies where there is a lot of waste. In this way, waste can be disposed of and space heating can be carried out.
- Efficiency and functionality of devices.
- Mobility of the device.
Despite the listed advantages, the burner also has a drawback. It is quite demanding on the quality of used oil.
Features of making your own liquid fuel burner
Externally, the burner resembles an empty gas cylinder small size, to which oppositely directed sections of steel pipe are attached at the top and bottom by welding.
Babington burner
Her inner size is one inch, and the wall is quite thick. The lower section is necessary to supply an oil-air suspension to the compartment where combustion occurs. The upper section is used as a burner bell. A torch of flame emerges from it with high temperature. To ensure the flow of air that is pumped into the furnace to form a torch, use a simple household vacuum cleaner with high power.
Making a burner with your own hands is quite simple. To do this, you will need a welding machine, with which the parts are connected, as well as a grinder and a lathe.
Manufacturing begins with the body. To do this, you need to find an empty gas cylinder. suitable size. Then remove the filler hole and use a template to mark the pipe fasteners. Then use an electric drill to drill them along the inside of the circuit. To do this, you need to use a drill in the form of a spiral. With a high degree of accuracy, using a chisel or grinder, you need to remove the jumpers between the holes. In order for the holes for fitting the pipes to be correct form, you need to grind them using a round file by hand. This can also be done with a cutter by placing it in an electric drill. When working with metal, you must follow safety regulations.
In the holes the right size pipes are inserted and welded. The pipes are measured in advance and sawed off with a grinder. A hole is made in the lower half of the pipe and an M16 nut is welded. This hole is necessary for attaching the oil nozzle.
The principle of feeding waste into the burner itself
The oil nozzle is made on a lathe. For the base, use a rod that has a smooth shank. It will be required when attaching the oil supply hose. If provided flexible liner, then it is necessary to cut a thread on this part. A metric thread is made along most of the length of the rod. The pipe diameter is 16 mm. A hole is drilled almost the entire length of the nozzle. It meets a transverse piece installed at the bottom, the diameter of which is 3 mm. If you have turning skills, then this part is easy to make with your own hands. And if not, then you can order it from a professional.
The principle of operation of the nozzle is based on the drainage of a viscous consistency from a hole drilled in the transverse part and its capture by the air flow. This process breaks the fuel into small droplets. Their combustion is much easier.
Air flow control

Making a furnace during mining
The strength of the fire torch depends on the intensity of the air flow. The adjustment system is based on a steel cup. It has a semicircular bottom and a hole of a certain diameter. This one is enough simple detail can also be done on a lathe. To accurately make the bottom in the form of a hemisphere, you need to use cutters, and, of course, it must be made by a highly qualified turner.
Adjustment of air flow is carried out by a curtain round shape. It is secured to the L-shaped axis using an M4 screw.
To firmly connect the outlet pipe onto which the hose is placed and operate the air valve, use an adapter that has a slot along its length.
During arson, access to the exhaust chamber is provided by a lid with a sufficiently large weight. It is installed on pre-welded canopies on the neck of the body. If the part is not such a massive part, then spontaneous opening of the device during operation is possible. If all the steps in assembling the burner were completed correctly, then its operation is accompanied by an even flame. purple, which occurs when the oil-air mixture burns in the body of the device.
When working with a liquid fuel burner, fire safety regulations must be observed. The attachment point of the nozzle itself and the hose through which liquid fuel is supplied must be protected with a steel screen. It will protect used oil from fire if the seal is broken.
Conclusion
Making a burner with your own hands is quite simple. But at the same time, it is necessary to follow safety rules when working with a lathe and performing metalworking operations. And in addition, comply with fire safety requirements, since all work performed involves the use of power tools. You need to be especially careful when choosing a cylinder for the burner body. It must be empty, otherwise, when making holes in it, an unforeseen situation may arise, which is fraught with quite life-threatening injuries to the master.


